
Building a Blog:
Howdy!
They say the best time to start a technical blog is twenty years ago, and that the second best time is today. Continue reading to learn about my site and how I built it.
Contents
- Humble Beginnings
- GitHub Pages
- Jekyll
- Custom Ruby Plugins
- Archive Page
- Tag System
- Search Function
- The Future
- Updates
Humble Beginnings
I really decided on building a blog when I started working on Peter Shirley’s Ray Tracing in One Weekend series. As excellent as the content is, some of the explanations and illustrations are a bit muddy. Searching for additional resources led me to Victor Li’s Blog. Inspired by the clarity, variety, and layout of Victor’s blog, I constructed a similar site for myself to document my work and as a developer.
GitHub Pages
As you may have surmised from the URL, this site is hosted by GitHub Pages. Originally, I was going to register a domain from Hostinger, but GitHub Pages is FREE. Additionally, GitHub is probably the most sensible place to expand my portfolio, and a static site is all I really needed for a technical blog… for now.
The only real trouble I ran into was trying to use custom plugins. More on this issue and how I went about solving it below.
Jekyll
Straight from Jekyll’s GitHub page…
Jekyll is a simple, blog-aware, static site generator perfect for personal, project, or organization sites. Think of it like a file-based CMS, without all the complexity. Jekyll takes your content, renders Markdown and Liquid templates, and spits out a complete, static website ready to be served by Apache, Nginx or another web server. Jekyll is the engine behind GitHub Pages, which you can use to host sites right from your GitHub repositories.
For the most part, Jekyll has been a breeze to work with, and their documentation is top-notch. I would recommend it to anyone looking to build a static site.
Custom Ruby Plugins
When constructing the site, this is where I ran into the most trouble. It turns out that when using the github-pages gem, the site is generated in safe mode and the plugins directory is a random string. Additionally, only a few Jekyll plugins are whitelisted by GitHub Pages. When constructing the tag feature, tags worked fine locally, but when pushing to the master branch, the live site had broken elements. Same with the archive page.
One solution is to build the site locally and push the generated site files to GitHub. In this way, GitHub would interpret the site as static files and not as a Jekyll project - skipping the build process. However, doing so would require a lot of manual file management and would be prone to human error.
The better solution, of course, is to automate. Big thanks to Josh Frankel and his post detailing the process.
Update:
Since June 15th, 2021, the building on travis-ci.org is ceased. Please use travis-ci.com from now on.
This includes a brand new subscription fee! And re-configuring!
I don’t feel like dealing with that (or looking into other options right now), so for the time being, I’ll just be jekyll build-ing source and pushing the updated directory _site to master.</span>
Update(Sep 2022): I wrote a little bash script to update the live site from the source branch. Git worktree is a neat feature! I’ve never used it before. Here’s the script:
#!/bin/bash


if [ $(basename $PWD) != eldun.github.io ]
then
    exit "Please execute 'update-live-site.sh' from the site's root directory"
fi

git checkout source

# Generate site from branch 'source'
bundle exec jekyll build

# Create a add directory 'live-site' which is essentially branch 'master'
git worktree add live-site master

# Move all generated files in _site to root directory of live site (mv doesn't have a recursive option, so I'm using cp)
cp -r _site/* live-site
rm -r _site

cd live-site
git add *
git commit -m "Update live site from branch 'source'"
git push

cd ..
git worktree remove live-site/
</span>
The basic idea is as follows:

-
Create a new branch off of master (in my case, it’s called source).
The source branch is where my changes take place from here on out. Source will contain the entire Jekyll project, but master will only contain the static
_sitefolder. It’s also recommended to make source the default branch, as well as protecting it. -
Generate a GitHub Personal Access Token for Travis CI and give it repo scope/access.
This will allow Travis CI to perform pushes.
-
Configure the Jekyll site to work with Travis CI.
Buckle in, becuase the next part of the process introduces a lot of changes to the Jekyll site.
-
Add the following to the
Gemfile:source "https://rubygems.org" ruby RUBY_VERSION # We'll need rake to build our site in TravisCI gem "rake", "~> 12" gem "jekyll" # Optional: Add any custom plugins here. # Some useful examples are listed below group :jekyll_plugins do gem "jekyll-feed" gem "jekyll-sitemap" gem "jekyll-paginate-v2" gem "jekyll-seo-tag" gem "jekyll-compose", "~> 0.5" gem "jekyll-redirect-from" end -
Ensure any Gemfiles used in the Gemfile are in
_config.ymlas well. -
Exclude certain files to ensure they don’t end up in master after Travis CI builds source.
-
Sample
_config.yml:title: Your blog title email: your.email@gmail.com # many other settings # ... # Any plugins within jekyll_plugin group from Gemfile plugins: - jekyll-feed - jekyll-sitemap - jekyll-paginate-v2 - jekyll-seo-tag - jekyll-compose - jekyll-redirect-from # Exclude these files from the build process results. # Prevents them from showing up in the master branch which # is the live site. exclude: - vendor - Gemfile - Gemfile.lock - LICENSE - README.md - Rakefile -
Since master will be used to display the static site, we need git to ignore changes to
_site. Add the following to.gitignore:.sass-cache .jekyll-metadata _site -
A
.travis.ymlfile is needed to inform Travis CI how to run:#All of this together basically says, “Using the source branch from this repo, push all the files found within the site directory to the master branch of the repo”. language: ruby #Use Ruby rvm: - 2.3.1 #Use RVM to set ruby version to 2.3.1 install: - bundle install #Run bundle install to install all gems. deploy: provider: pages #Use TravisCI’s Github Pages provider skip_cleanup: true #Preserve files created during build phase. github_token: $GITHUB_TOKEN # Our personal access token. This is currently a reference to an environment variable which will be added in the TravisCI setup section below. local_dir: _site #Use all files found in this directory for deployment. target_branch: master #Push resulting build files to this branch on Github. on: branch: source #Only run TravisCI for this branch. -
The
.travis.ymlonly works by using the followingRakefileto manually build the site:# filename: Rakefile task :default do puts "Running CI tasks..." # Runs the jekyll build command for production # TravisCI will now have a site directory with our # statically generated files. sh("JEKYLL_ENV=production bundle exec jekyll build") puts "Jekyll successfully built" end -
The
Rakefileruns on every build. All checks must be passed before Travis CI will deploy the build. -
Set up Travis CI.
Sign in to Travis CI. Find the appropriate repository and enable it. Create a new environment variable named
GITHUB_TOKENfrom the repository settings page and enter the Personal Access Token from way back when. -
Cross fingers and PUSH (to source).
-
The Travis CI build should start, complete, and the site will be live!
WOW! Quite a bit of work for some custom plugins! Namely, my archive page and tag system. Again, HUGE thanks to Josh Frankel for his post!
Archive Page
The archive page I have on my site at the time of this post is adapted from Sodaware’s Repository. There’s not much to it, just some basic ruby data collection and a simple layout file. I would eventually like to style it in a way that is more pleasing on mobile devices.
Tag System
For post tagging, I followed an example from Lunar Logic. In the Lunar Logic post, the author, Anna Ślimak, details using Jekyll hooks - which allow for fine-grained control over various aspects of the build process. For example, one could execute custom functionality every time Jekyll renders a post. That’s exactly what I’m doing on my site for the tags.
While tags can simply be entered in the Front Matter of posts, no html is generated for that specific tag. I could manually create a file for said tag in the tags directory, but the hook automatically does that work for me.
Here’s the code:
Jekyll::Hooks.register :posts, :post_write do |post|
    all_existing_tags = Dir.entries("tags")
      .map { |t| t.match(/(.*).md/) }
      .compact.map { |m| m[1] }

    tags = post['tags'].reject { |t| t.empty? }
    tags.each do |tag|
      generate_tag_file(tag) if !all_existing_tags.include?(tag)
    end
  end

  def generate_tag_file(tag)
    File.open("tags/#{tag}.md", "wb") do |file|
      file << "---\nlayout: tag-page\ntag: #{tag}\n---\n"
    end
  end
Search Function
The search function was adapted from Christian Fei’s Simple Jekyll Search. Here’s the rundown:
Jekyll is all client-side, so the required content for a search must be stored in a file on the site itself.
Within the root of the Jekyll project, a .json file is created from existing posts containing data to search through:
---
---
[
  {% for post in site.posts %}
    {

      "postTitle"       : "{{ post.title | escape }}",
      "postSubtitle"    : "{{ post.subtitle | escape }}",
      "postTags"        : "{{ post.tags | join: ', ' }}",
      "postDate"        : "{{ post.date }}",
      "postUrl"         : "{{ post.url }}"

    } {% unless forloop.last %},{% endunless %}
  {% endfor %}
]
This code generates a search.json file in the _site directory. Don’t forget to add escape characters to prevent the .json file from getting messed up. Liquid has some useful filters that can help out. Here’s a snippet of my generated search.json:
...
    {

      "postTitle"       : "Building a Blog:",
      "postSubtitle"    : "Howdy!",
      "postTags"        : "web, ruby",
      "postDate"        : "2020-05-18 00:00:00 -0400",
      "postUrl"         : "/2020/05/18/building-a-blog.html"

    } ,
...
If we wanted to include other aspects of the post in our search, such as the excerpt, content, or custom variables, we could easily follow the template above.
Save the search script in /js/simple-jekyll-search.js.
I placed the necessary HTML elements for the search function inside /_includes/search-bar.html:
<!-- Html Elements for Search -->
<div id="search-container" style="visibility: hidden;">
  <input type="text" id="search-input" placeholder="Search..." />
  <ul id="results-container"></ul>
</div>

<!-- Script pointing to search-script.js -->
<script src="/js/site-scripts/search-script.js" type="text/javascript"></script>

<!-- Configuration -->
<script>
  SimpleJekyllSearch({
    searchInput: document.getElementById('search-input'),
    resultsContainer: document.getElementById('results-container'),
    json: '/search.json',
    searchResultTemplate: '<li><a href="eldun.github.io{postUrl}">{postTitle} {postSubtitle}</a></li>'
  })</script>
and included it right below the nav bar in /_layouts/default.html.
The searchResultTemplate variable above determines what is included in the dropdown search results.
Lastly, I added some javascript at /js/site-scripts/toggle-search.js to toggle the search bar from visible to hidden:
 function toggleSearch() {
    var search_container = document.getElementById("search-container");
    var search_button = document.getElementById("search-button");
    var search_input = document.getElementById("search-input");
    var results_container = document.getElementById("results-container")


    if (search_container.style.visibility == "hidden") {
      search_container.style.visibility = "visible";
      search_input.value = "";
      results_container.style.visibility = "hidden";
      search_input.focus();

    search_input.oninput = handleInput;


      document.onkeydown = function(evt) {
        evt = evt || window.event;

        if (search_input.value == "") {
          results_container.style.visibility = "hidden";
        }
        else {
          results_container.style.visibility = "visible";
        }

        if (evt.keyCode == 27 && search_container.style.visibility == "visible") {
          toggleSearch();
          return;
        }

    };

    function handleInput(e) {
      if (search_input.value != "") {
        results_container.style.visibility = "visible";
      }
      else {
        results_container.style.visibility = "hidden";
      }
    }

    } else {
      search_container.style.visibility = "hidden";
    }

    // Styling
    if (search_container.style.visibility == "visible"){
      search_button.style.color = "#42cad1"
      search_container.style.display = "block";
      // search_input.focus();
    }
    else {
      search_button.style.color = "#cc773f";
      search_container.style.display = "none";
    }
  }
The Future
From here onwards, I plan to document as concisely and as compellingly as possible every personal project I undertake.
Oh, and to reformat my style.css. It’s a little sloppy.
Updates
Refactored my CSS into multiple files
I used to have one monolithic `style.scss` file. Thanks to [Sass](https://sass-lang.com/), variables, and some refactoring, this is the result:
eldun.github.io/
    ├── assets/
    │   ├── css/
    │   │   └── style.scss
    │   ├── images/
    │   └── webfonts/
    ├── _sass/
    │   ├── fontawesome/
    │   └── site/
    │       ├── about-me.scss
    │       ├── archive.scss
    │       ├── header.scss
    │       ├── images.scss
    │       ├── mathjax.scss
    │       ├── nav.scss
    │       ├── post-navigation.scss
    │       ├── posts.scss
    │       ├── search.scss
    │       └── tags.scss
    └── ...
`style.scss` is now mostly imports and high-level stylings:
---
---
$color-primary: {{ site.data.colors["primary"]["dark-theme"] }};
$color-secondary:  {{ site.data.colors["secondary"]["dark-theme"] }};
$color-accent: {{ site.data.colors["accent"]["dark-theme"] }};
$color-clickable: {{ site.data.colors["clickable"]["dark-theme"] }};
$color-text: {{ site.data.colors["text"]["dark-theme"] }};

/* This file extends/overrides the CSS file used by "jekyll-theme-cayman" (_site/assets/css/style.css)
  https://help.github.com/en/github/working-with-github-pages/adding-a-theme-to-your-github-pages-site-using-jekyll#customizing-your-themes-css
*/


// I took this out for a second, but putting it back in is easier than writing a bunch of responive css
@import "jekyll-theme-cayman";

// The default folder for scss files is _sass (this can be changed in config.yml)
// Was having a lot of trouble trying to use fontawesome icons with their relative paths
// before creating the_sass directory and moving the scss files there.
@import "fontawesome/fontawesome.scss";
@import "fontawesome/solid.scss";
@import "fontawesome/brands.scss";
@import "fontawesome/regular.scss";


@import "site/header.scss";
@import "site/nav.scss";

@import "site/posts.scss";
@import "site/post-navigation.scss";
@import "site/images.scss";

@import "site/mathjax.scss";

@import "site/about-me.scss";
@import "site/archive.scss";
@import "site/tags.scss";
@import "site/search.scss";

// CSS rules here
Started using Prism Syntax highlighter
All I had to do was generate js and css files from Prism's site, plop them into my site directory, and link 'em. To decorate a code snippet with a specific language, all I need to do is specify a code block like so: `<pre><code class="language-xxxx">`
eldun.github.io
    ├── assets/
    │   ├── css/
    │   │   └── style.scss // import generated prism css here
    │   ├── images/
    │   └── webfonts/
    ├── _config.yml
    ├── _data/
    ├── downloads/
    ├── _drafts/
    ├── Gemfile
    ├── Gemfile.lock
    ├── _includes/
    ├── index.md
    ├── js/
    │   ├── post-scripts/
    │   └── site-scripts/
    │       ├── prism.js // generated by prism
    │       ├── search-script.js
    │       ├── toggle-search.js
    │       └── vanilla-back-to-top.min.js
    ├── _layouts/
    │   ├── archive-page.html
    │   ├── default.html // link to generated prism js here
    │   ├── post.html
    │   └── tag-page.html
    ├── _plugins/
    ├── _posts/
    ├── Rakefile
    ├── _sass/
    │   ├── fontawesome/
    │   └── site/
    │       ├── about-me.scss
    │       ├── archive.scss
    │       ├── header.scss
    │       ├── images.scss
    │       ├── mathjax.scss
    │       ├── nav.scss
    │       ├── post-navigation.scss
    │       ├── posts.scss
    │       ├── prism.scss // generated by prism
    │       ├── search.scss
    │       └── tags.scss
└── ...Dynamic (& prettier) Table of Contents
Manual tables of content are time intensive and prone to authoring errors, I've come to find. Thankfully there's a gem for generating a 'toc' dynamically, so I don't have to do too much work. The instructions are as follows:
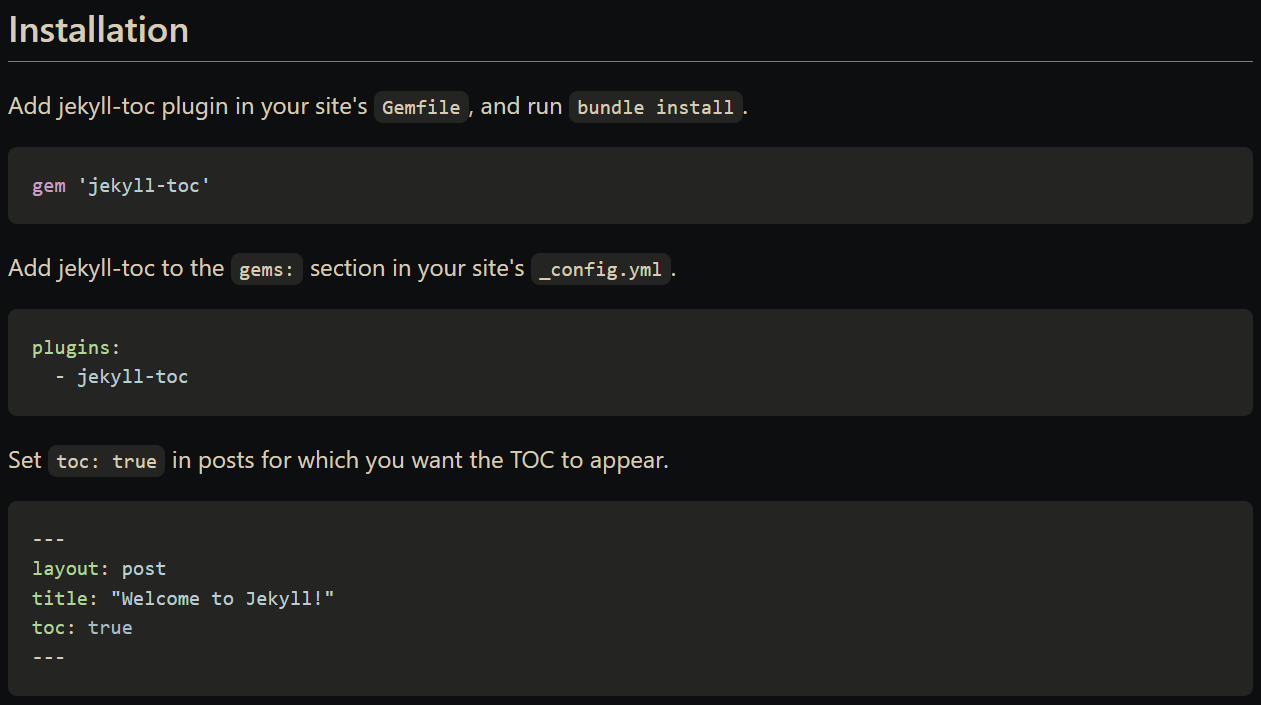 After following these steps, I only need to change a few things in
 _layouts/post.html`:
<div class="post-header inactive">
<h1 id="post-title">{{ page.title }}</h1>
<h3 id="post-subtitle">{{ page.subtitle }}</h3>
<div class="post-date">
    <i class="fas fa-calendar"></i> <time>{{ page.date | date_to_string }}</time>
</div>
</div>

<img src="{{ page.header-image }}" alt="{{ page.header-image-alt }}" title="{{ post.header-image-description }}">

+ <div class='table-of-contents'>{{ content | toc_only }}</div>

+ {{ content | inject_anchors }}

<hr>
<h1><i class="fas fa-hand-peace"></i></h1>
<div class="post-tags">
    {% include post-tags.html %}
</div>
Add the ability to use Liquid in Front Matter
I've started putting more of my post content into the [Front Matter](https://jekyllrb.com/docs/front-matter/) and letting my layout do most of the work. You can't natively use [Liquid](https://jekyllrb.com/docs/liquid/) in Front Matter, but there's a gem for enabling such functionality.
Hook eldun.github.io up to a custom domain
Looks are everything, sometimes. After spending some cash on a custom domain with mailchimp, I thought I'd be able to simply drag-n-drop my statically generated website into their filesystem and have it just work. Nope! Based on my limited understanding of the internet, I had three options: - Redirect eldun.github.io to eldun.net(which would require rebuilding my site with MailChimp's tools and changing my whole workflow) - Redirect eldun.net to eldun.github.io (better, but still ugly) - Ask for help from MailChimp support I asked for help, and Fernando was able to set up a masked forward from eldun.net to eldun.github.io - showing the content of eldun.github.io, but leaving the URL as eldun.net. This will take effect (hopefully) in the next 48 hours. Oddly enough, the configuration for masked forwarding is hidden from the user in Mailchimp: > (09:00:00 PM) Evan: okay, are these settings available for me to look at within the domain settings? > (09:00:45 PM) Fernando : You would not be able to see that within the domain settings, if you need to make any changes to the forward you would reach out to us directly