
Morso:
Creating a Morse Code Android Application with Kotlin

I need to learn Morse code if I want to be able to communicate with my cool neighbors.
Contents
- Why Morse Code?
- The General Idea
- Getting Started
- Declaring IME Components in the Manifest
- Declaring the Settings Activity for the IME
- Creating our MorsoIME Class
- Creating our Input View
- Creating a Placeholder Layout
- Creating our Custom MorsoView
- Overriding onSizeChanged()
- Creating a Paint Object for Drawing Text
- Drawing our View
- Making our View Interactive
- Representing UI State
- Storing UI Data for our Input Service
- Updating our View with New UI Data
- Resetting our Background Text After a Delay
- Representing Morse Code
- Using Morso for Input
- Translating Gestures to Morse Code
- Implementing Candidates View
- Sending Input
- To be continued
Why Morse Code?
Occasionally, I find myself at a bar, yelling in someone’s ear just to be heard. No good - it’s one of my least-favorite things to do or to have done to me.
One of my favorite things in this world is the process of getting better at useless-adjacent things. Rather than spending hours learning American Sign Language (which is on my to-do list), I could just learn 26 characters in Morse code and tap out a message across the table or upon my friend’s shoulder!
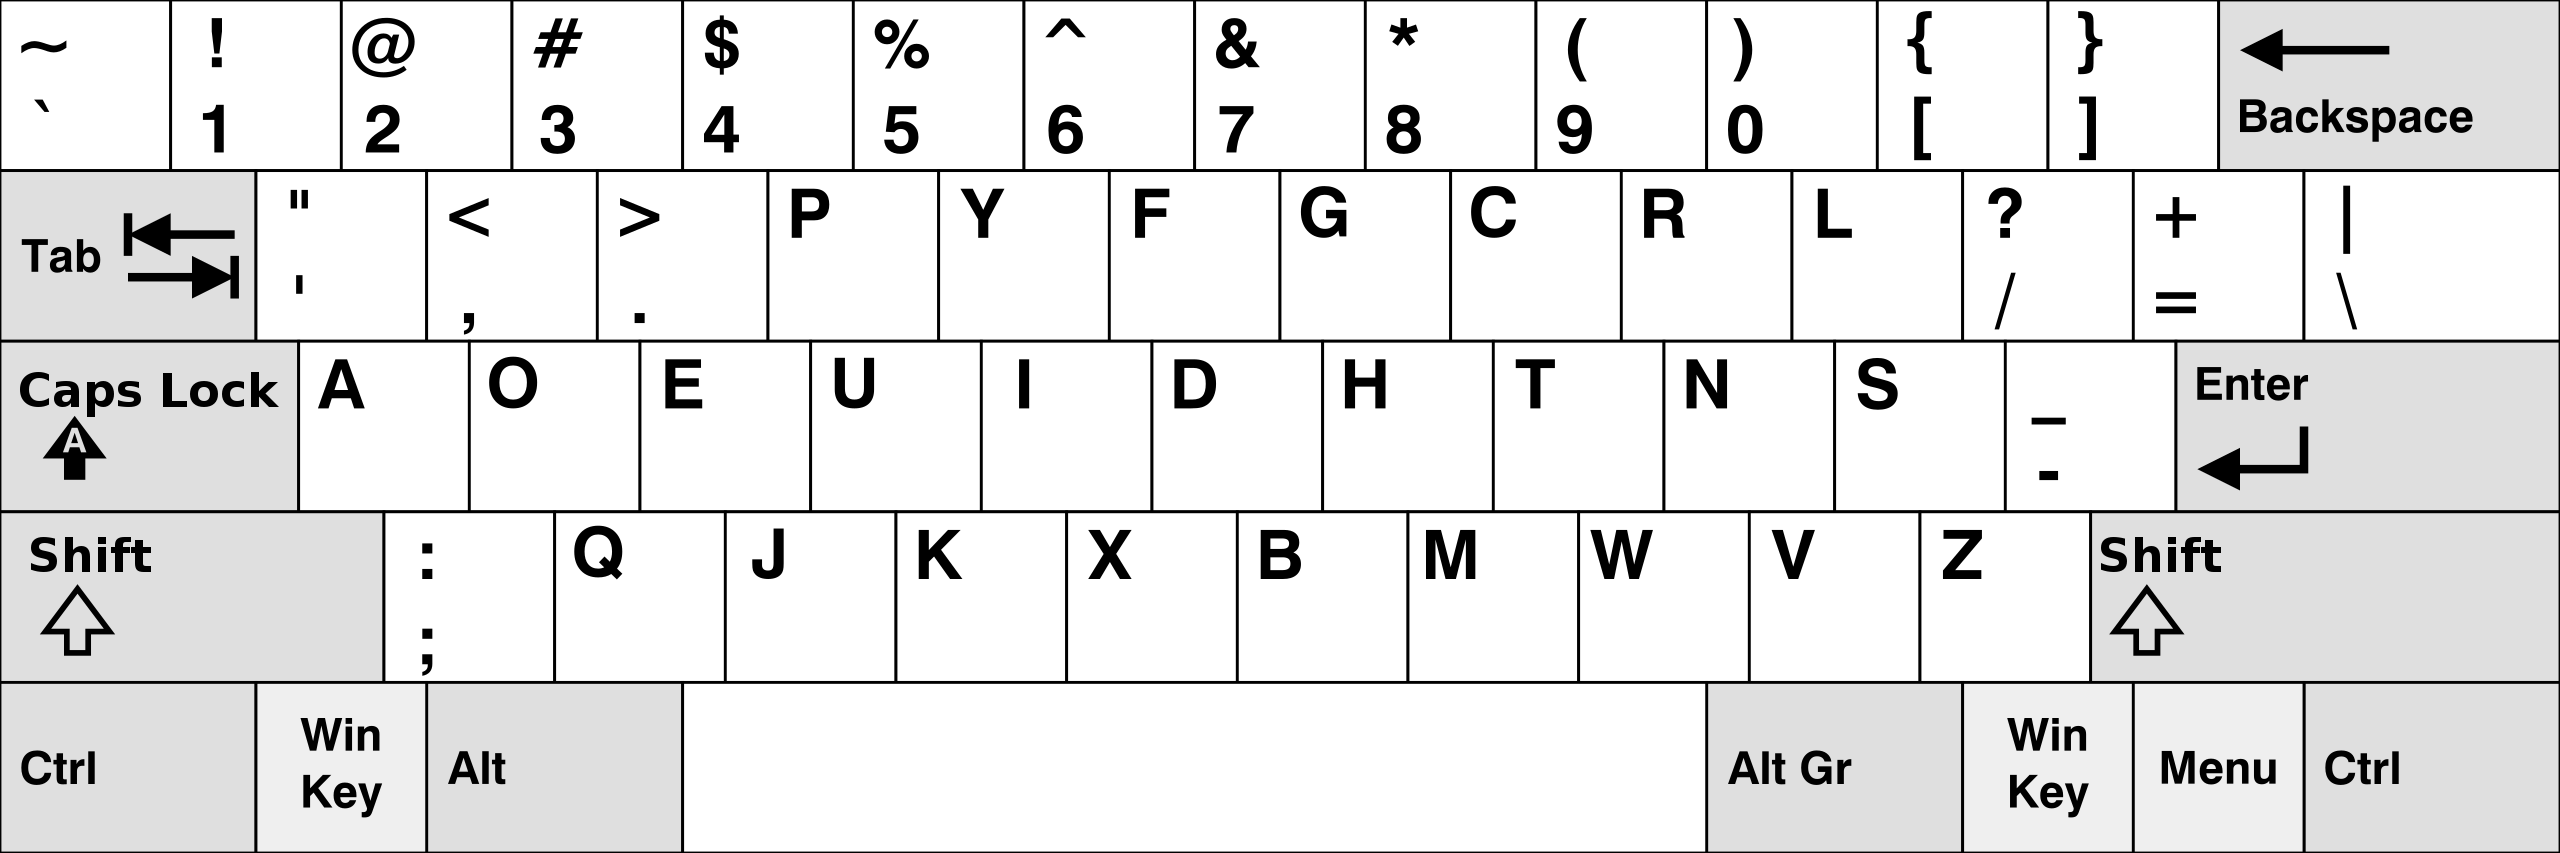
I already learned the Dvorak keyboard layout (not recommended) - which is unsurprisingly pretty similar to the structure of Morse code (look at the home row)! Obviously, the most used letters are the most accessible.

Additionally, the scope of this project seems perfect for getting back into Android development(sorry SeeNatural) and learning Kotlin.
The General Idea
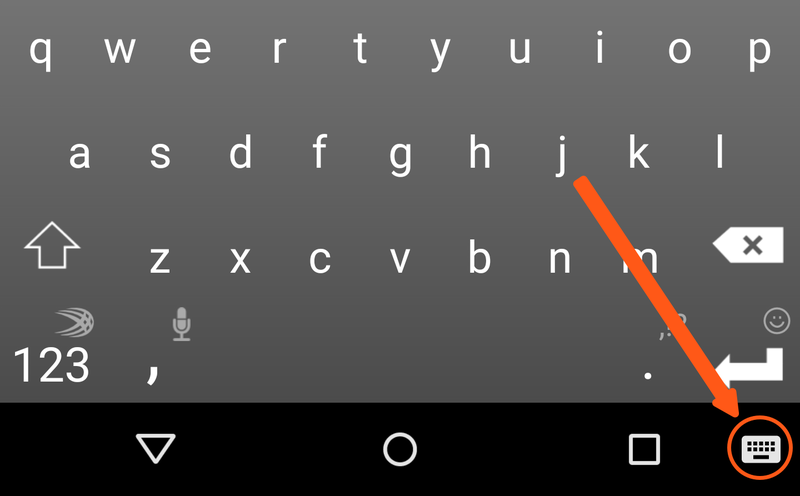
I believe the best way to learn is by doing, which is why I want to create a custom Morse keyboard. Android has a useful “language/input” button for switching the keyboard quickly:
I’m not trying to reinvent the keyboard - just creating a handy, accessible practice tool. For that reason, I’ll be structuring my application in much the same way that GBoard does - a keyboard with some settings and utilities accessible from the top row.
Some practice ideas I’ve had are as follows:
- Reading/Typing Morse
- Reading Morse through vibration/sound/flashing
- Time Trials
Morso will be written in Kotlin, Android’s “official” language.
Getting Started
The most obvious first step to me is to create an input service that can be used system-wide. The Android Developer article on input methods and this StackOverflow answer will be exceedingly helpful.
Declaring IME Components in the Manifest
Official documentation for this step can be found here, but we’re basically going to throw a snippet into our app’s AndroidManifest.xml.
The following snippet declares an IME service. It requests the permission BIND_INPUT_METHOD to allow the service to connect the IME to the system, sets up an intent filter that matches the action android.view.InputMethod, and defines metadata for the IME:
<!-- Declares the input method service -->
<service android:name="MorsoIME"
    android:label="@string/morso_label"
    android:permission="android.permission.BIND_INPUT_METHOD">
    <intent-filter>
        <action android:name="android.view.InputMethod" />
    </intent-filter>
    <meta-data android:name="android.view.im"
               android:resource="@xml/method" />
</service>
I was notified of an error about how android:exported must be set to true or false - I set it to true. You can read about the exported attribute here.
I was also warned that the android.preference library is deprecated when I created the xml/method file. I added this line to my build.gradle (Module: app):
dependencies {
    ...
    implementation "androidx.preference:preference:1.1.0"
    ...
}
Another issue I was having was that I was unable to select Morso as an input method. The reason why was that I had not yet added any subtypes to res/xml/method.xml. For now, you can paste this minimal example into res/xml/method.xml:
<?xml version="1.0" encoding="utf-8"?>
<input-method
    xmlns:android="http://schemas.android.com/apk/res/android">

    <subtype
        android:imeSubtypeMode="keyboard"/>

</input-method>
We will cover subtypes in further detail later on in this series.
My complete AndroidManifest.xml looks like this (I have no activities, as you can see.):
<?xml version="1.0" encoding="utf-8"?>
<manifest xmlns:android="http://schemas.android.com/apk/res/android"
    package="net.eldun.morso">

    <application
        android:allowBackup="true"
        android:icon="@mipmap/ic_launcher"
        android:label="@string/app_name"
        android:roundIcon="@mipmap/ic_launcher_round"
        android:supportsRtl="true"
        android:theme="@style/Theme.Morso" />

    <!-- Declares the input method service -->
    <service android:name="MorsoIME"
        android:label="@string/morso_label"
        android:permission="android.permission.BIND_INPUT_METHOD"
        android:exported="true">
        <intent-filter>
            <action android:name="android.view.InputMethod" />
        </intent-filter>
        <meta-data android:name="android.view.im"
            android:resource="@xml/method" />
    </service>

</manifest>
Declaring the Settings Activity for the IME
This next snippet declares the settings activity for the IME. It has an intent filter for ACTION_MAIN that indicates this activity is the main entry point for the IME application:
You can also provide access to the IME’s settings directly from its UI.
We will create the settings screen later on in this series.
Creating our MorsoIME Class
You may have noticed that we have a warning that a service by the name of MorsoIME could not be found! Go ahead and create a new Kotlin class - MorsoIME - that extends InputMethodService:
The central part of an IME is a service component, a class that extends InputMethodService. In addition to implementing the normal service lifecycle, this class has callbacks for providing your IME’s UI, handling user input, and delivering text to the field that currently has focus. By default, the
InputMethodServiceclass provides most of the implementation for managing the state and visibility of the IME and communicating with the current input field.
This is what our placeholder MorsoIME looks like (we’ll create our UI in the next section):
class MorsoIME : InputMethodService() {

    override fun onCreateInputView(): View {
        return layoutInflater.inflate(R.layout.input, null).apply {
            if (this is MorsoView) {
                setOnKeyboardActionListener(this)
//                keyboard = latinKeyboard
            }
        }
    }

    private fun setOnKeyboardActionListener(action : MorsoIME) {

    }

}
If you’re confused by that apply block, read about Kotlin’s scope functions and higher-order functions.
Creating our Input View
We have two options for designing our UI - the traditional “Views” method, and the newer “Jetpack Compose” method. We’ll go through both for completeness, starting… (On second thought, we’ll try Jetpack Compose when we implement our settings activity. I like to keep moving forward in these blog posts).
Almost everything you could want to know about views can be found
- here (how android draws views),
- here (layouts),
- here (creating custom components),
- and here (a codelab on creating custom views).
Creating a Placeholder Layout
Create res/morso.xml:
<?xml version="1.0" encoding="utf-8"?>
<androidx.constraintlayout.widget.ConstraintLayout xmlns:android="http://schemas.android.com/apk/res/android"
    xmlns:app="http://schemas.android.com/apk/res-auto"
    android:layout_width="match_parent"
    android:layout_height="match_parent">

    <ImageView
        android:id="@+id/morsoView"
        android:layout_width="0dp"
        android:layout_height="wrap_content"
        app:srcCompat="@drawable/ic_launcher_background"
        app:layout_constraintBottom_toBottomOf="parent"
        app:layout_constraintEnd_toEndOf="parent"
        app:layout_constraintStart_toStartOf="parent" />

</androidx.constraintlayout.widget.ConstraintLayout>
Note that setting the ImageView dimensions to 0dp is equivalent to match_constraint.
Once we create our custom MorsoView class, we’ll replace the <ImageView> tag with <net.eldun.morso.MorsoView>.
Creating our Custom MorsoView
Create a new Kotlin class called MorsoView.
Modify the class definition to extend View.
Click on View and then click the red bulb. Choose Add Android View constructors using ‘@JvmOverloads’. Android Studio adds the constructor from the View class. The @JvmOverloads annotation instructs the Kotlin compiler to generate overloads for this function that substitute default parameter values.
package net.eldun.morso

import android.content.Context
import android.util.AttributeSet
import android.view.View

class MorsoView @JvmOverloads constructor(
    context: Context,
    attrs: AttributeSet? = null,
    defStyleAttr: Int = 0
) : View(context, attrs, defStyleAttr) {

}
Now let’s follow the steps necessary to draw a custom view. How about we start with a black rectangle with “Morso” in the center?
We could do both of these tasks in XML by extending a Button view (rather than a generic View) and using the background and buttonText attributes - or by Defining Custom Attributes for our totally custom view. I don’t have a great reason for setting properties programmatically, other than the fact that it’s fast.
Overriding onSizeChanged()
First, we’ll override the onSizeChanged() -
The onSizeChanged() method is called any time the view’s size changes, including the first time it is drawn when the layout is inflated. Override onSizeChanged() to calculate positions, dimensions, and any other values related to your custom view’s size, instead of recalculating them every time you draw.
Add member floats centerX and centerY to our MorsoView class, and then calculate them in onSizeChanged
override fun onSizeChanged(width: Int, height: Int, oldWidth: Int, oldHeight: Int) {
   centerX = (width.toFloat / 2.0)
   centerY = (height.toFloat / 2.0)
}
This won’t exactly center the text (there’s a lot going on with fonts!) - it’s only a placeholder. If you wish you can add the code to actually center it.
Creating a Paint Object for Drawing Text
We’re going to need a Paint object for drawing text:
class MorsoView @JvmOverloads constructor(
    context: Context,
    attrs: AttributeSet? = null,
    defStyleAttr: Int = 0
) : View (context, attrs, defStyleAttr) {

+    private val paint = Paint(Paint.ANTI_ALIAS_FLAG).apply {
+        // Paint styles used for rendering are initialized here. This
+        // is a performance optimization, since onDraw() is called
+        // for every screen refresh.
+        style = Paint.Style.FILL
+        textAlign = Paint.Align.CENTER
+        textSize = 55.0f
+    }

    private var centerX = 100F
    private var centerY = 100F
Drawing our View
Next, we’ll draw our view by overriding onDraw() (we’ll also set the background color here):
    override fun onDraw(canvas: Canvas) {
        super.onDraw(canvas)

        this.setBackgroundColor(Color.BLACK)
        canvas.drawText("Morso", centerX, centerY, paint)
    }
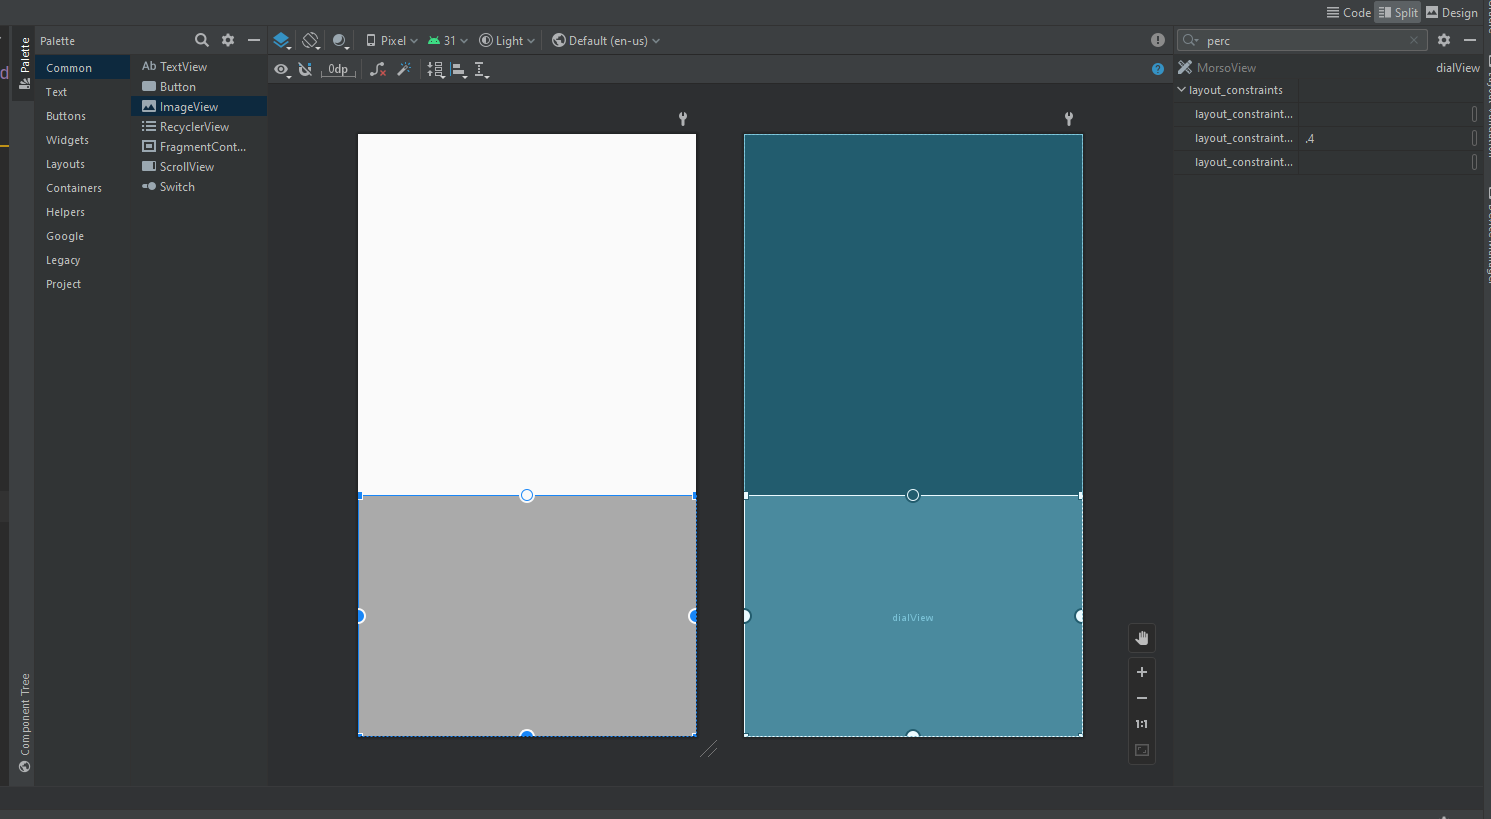
If you take a look at our generated layout, you’ll notice MorsoView takes up almost the whole screen. While this might be useful for typing without looking, it’s definitely not a reasonable default.
In order to determine how much space MorsoView is alloted, we’ll have to override onMeasure(). Two helpful snippets about onMeasure() can be found here and here.
From the second link:
onMeasure’s parameters are View.MeasureSpec values that tell you how big your view’s parent wants your view to be, and whether that size is a hard maximum or just a suggestion. As an optimization, these values are stored as packed integers, and you use the static methods ofView.MeasureSpecto unpack the information stored in each integer.
This StackOverflow answer has a nice description of the different MeasureSpecs and how they relate to the width and height we set in our res/morso.xml
Add a helper function to get the screen height:
    fun getScreenHeight(): Int {
        return Resources.getSystem().getDisplayMetrics().heightPixels
    }
Now we can override MorsoView’s onMeasure() and set the height to a quarter of the screen height:
override fun onMeasure(widthMeasureSpec: Int, heightMeasureSpec: Int) {
        val desiredWidth = 100;
        val desiredHeight = getScreenHeight() / 4;

        val widthMode = MeasureSpec.getMode(widthMeasureSpec);
        val widthSize = MeasureSpec.getSize(widthMeasureSpec);
        val heightMode = MeasureSpec.getMode(heightMeasureSpec);
        val heightSize = MeasureSpec.getSize(heightMeasureSpec);

        var width : Int;
        var height : Int;

        //Measure Width
        when (widthMode) {
            MeasureSpec.EXACTLY -> width = widthSize;
            MeasureSpec.AT_MOST -> width = Math.min(desiredWidth, widthSize);
            else -> width = desiredWidth;
        }

        // Measure Height
        when (heightMode) {
            MeasureSpec.EXACTLY -> height = heightSize;
            MeasureSpec.AT_MOST -> height = Math.min(desiredHeight, heightSize);
            else -> height = desiredHeight;
        }

        //MUST CALL THIS
        setMeasuredDimension(width, height);
    }

Making our View Interactive
The article for this section can be found here.
Like many other UI frameworks, Android supports an input event model. User actions are turned into events that trigger callbacks, and you can override the callbacks to customize how your application responds to the user. The most common input event in the Android system is touch, which triggers onTouchEvent(android.view.MotionEvent).
Touch events by themselves are not particularly useful. Modern touch UIs define interactions in terms of gestures such as tapping, pulling, pushing, flinging, and zooming. To convert raw touch events into gestures, Android provides GestureDetector.
The obvious gestures that we’re going to be looking for are taps(dots) and holds(dashes). Eventually, we might want to listen for swipes to signal the end of a string or to switch to numerical input.
To learn more about gestures, go here.
If you only want to process a few gestures, you can extend
GestureDetector.SimpleOnGestureListenerinstead of implementing theGestureDetector.OnGestureListenerinterface.
Create a new MorsoGestureListener class that extends SimpleGestureListener:
package net.eldun.morso

import android.util.Log
import android.view.GestureDetector
import android.view.MotionEvent

class MorsoGestureListener : GestureDetector.SimpleOnGestureListener() {

    val TAG = "MorsoGestureListener"

    override fun onDown(e: MotionEvent): Boolean {
        Log.i(TAG, "downMotion detected!")

        return true
    }

    override fun onSingleTapUp(e: MotionEvent): Boolean {
        Log.i(TAG, "tap detected!")
        return true
    }

}
Whether or not you use GestureDetector.SimpleOnGestureListener, you must always implement an onDown() method that returns true. This step is necessary because all gestures begin with an onDown() message. If you return false from onDown(), as GestureDetector.SimpleOnGestureListener does, the system assumes that you want to ignore the rest of the gesture, and the other methods of GestureDetector.OnGestureListener never get called. The only time you should return false from onDown() is if you truly want to ignore an entire gesture. Once you’ve implemented GestureDetector.OnGestureListener and created an instance of GestureDetector, you can use your GestureDetector to interpret the touch events you receive in onTouchEvent().
In our MorsoView, add the following (along with any necessary imports):
class MorsoView @JvmOverloads constructor(
    context: Context,
    attrs: AttributeSet? = null,
    defStyleAttr: Int = 0
) : View (context, attrs, defStyleAttr) {

    val TAG = "MorsoView"

+    private val gestureListener =  MorsoGestureListener()
+    private val gestureDetector = GestureDetector(context, gestureListener)


    // ...
    // code
    // ...


+    override fun onTouchEvent(event: MotionEvent): Boolean {
+        return gestureDetector.onTouchEvent(event)
+    }

}
When you pass onTouchEvent() a touch event that it doesn’t recognize as part of a gesture, it returns false. You can then run your own custom gesture-detection code.
This is where we can implement gestures like triple taps in the future.
…
Thinking about it some more, we’re probably going to end up creating all of our own gestures from within MorsoView’s on onTouchEvent. In doing so, we’ll be able to specify custom timing delays for dots and dashes and the like. However, it’s good for now.
Let’s put things in place to replace the “Morso” text on touch inputs with the appropriate characters.
Representing UI State
The main article for this section is here. I suggest reading it.
Details on how IMEs handle config changes can be found here.
Here’s an explanation for why the UI state member(s) are immutable:
data class NewsUiState(
    val isSignedIn: Boolean = false,
    val isPremium: Boolean = false,
    val newsItems: List<NewsItemUiState> = listOf(),
    val userMessages: List<Message> = listOf()
)

data class NewsItemUiState(
    val title: String,
    val body: String,
    val bookmarked: Boolean = false,
    ...
)
The UI state definition in the example above is immutable. The key benefit of this is that immutable objects provide guarantees regarding the state of the application at an instant in time. This frees up the UI to focus on a single role: to read the state and update its UI elements accordingly. As a result, you should never modify the UI state in the UI directly unless the UI itself is the sole source of its data. Violating this principle results in multiple sources of truth for the same piece of information, leading to data inconsistencies and subtle bugs.
For example, if the bookmarked flag in a NewsItemUiState object from the UI state in the case study were updated in the Activity class, that flag would be competing with the data layer as the source of the bookmarked status of an article. Immutable data classes are very useful for preventing this kind of antipattern.
Key Point: Only sources or owners of data should be responsible for updating the data they expose.
Great. You might be wondering - as I was - “How does anything ever change, then?”
The answer is by using a mediator to process events and produce the UI state.
Interactions and their logic may be housed in the UI itself, but this can quickly get unwieldy as the UI starts to become more than its name suggests: it becomes data owner, producer, transformer, and more. Furthermore, this can affect testability because the resulting code is a tightly coupled amalgam with no discernable boundaries. Unless the UI state is very simple, the UI’s sole responsibility should be to consume and display UI state.
The classes that are responsible for the production of UI state and contain the necessary logic for that task are called state holders.
Key Point: The ViewModel type is the recommended implementation for the management of screen-level UI state with access to the data layer. Furthermore, it survives configuration changes (like rotations) automatically. ViewModel classes define the logic to be applied to events in the app and produce updated state as a result.
There are many ways to model the codependency between the UI and its state producer. However, because the interaction between the UI and its ViewModel class can largely be understood as event input and its ensuing state output, the relationship can be represented as shown in the following diagram illustrating the “Unidirectional Data Flow” pattern:
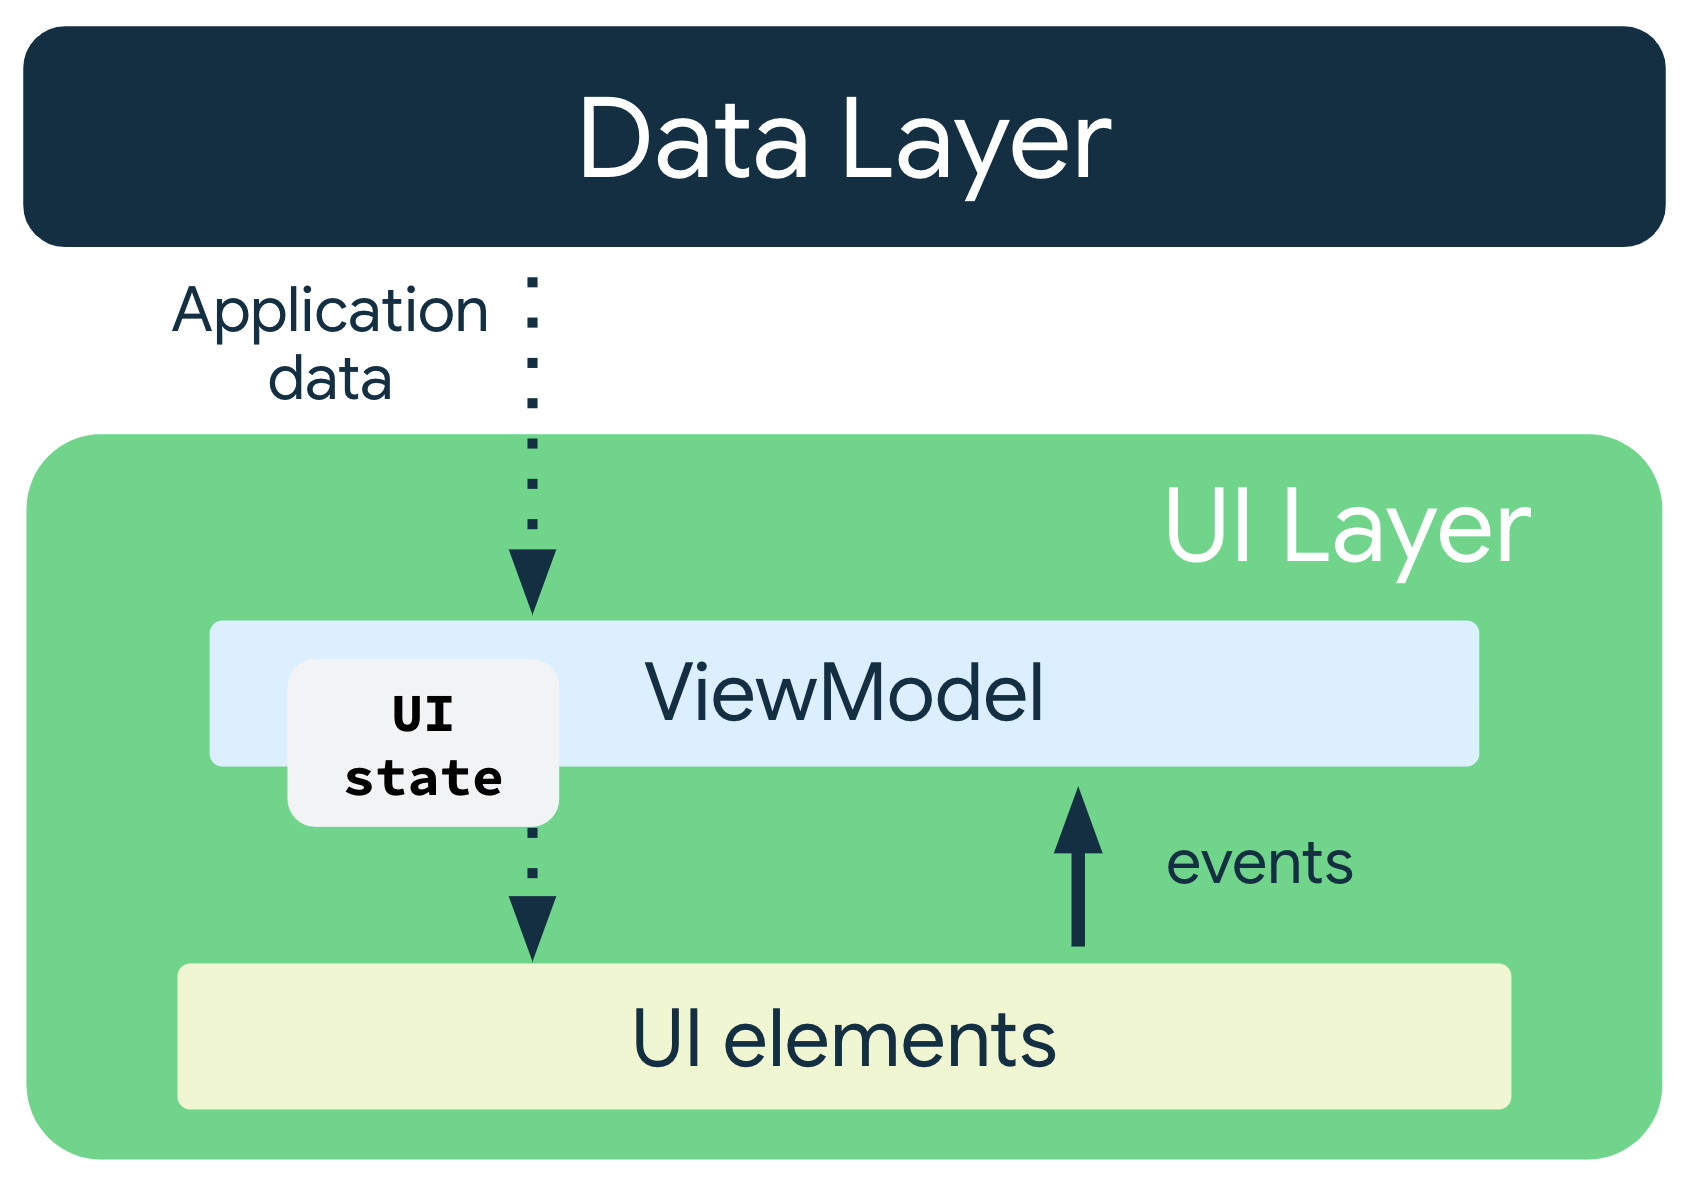
- The ViewModel holds and exposes the state to be consumed by the UI. The UI state is application data transformed by the ViewModel.
- The UI notifies the ViewModel of user events.
- The ViewModel handles the user actions and updates the state.
- The updated state is fed back to the UI to render.
- The above is repeated for any event that causes a mutation of state.
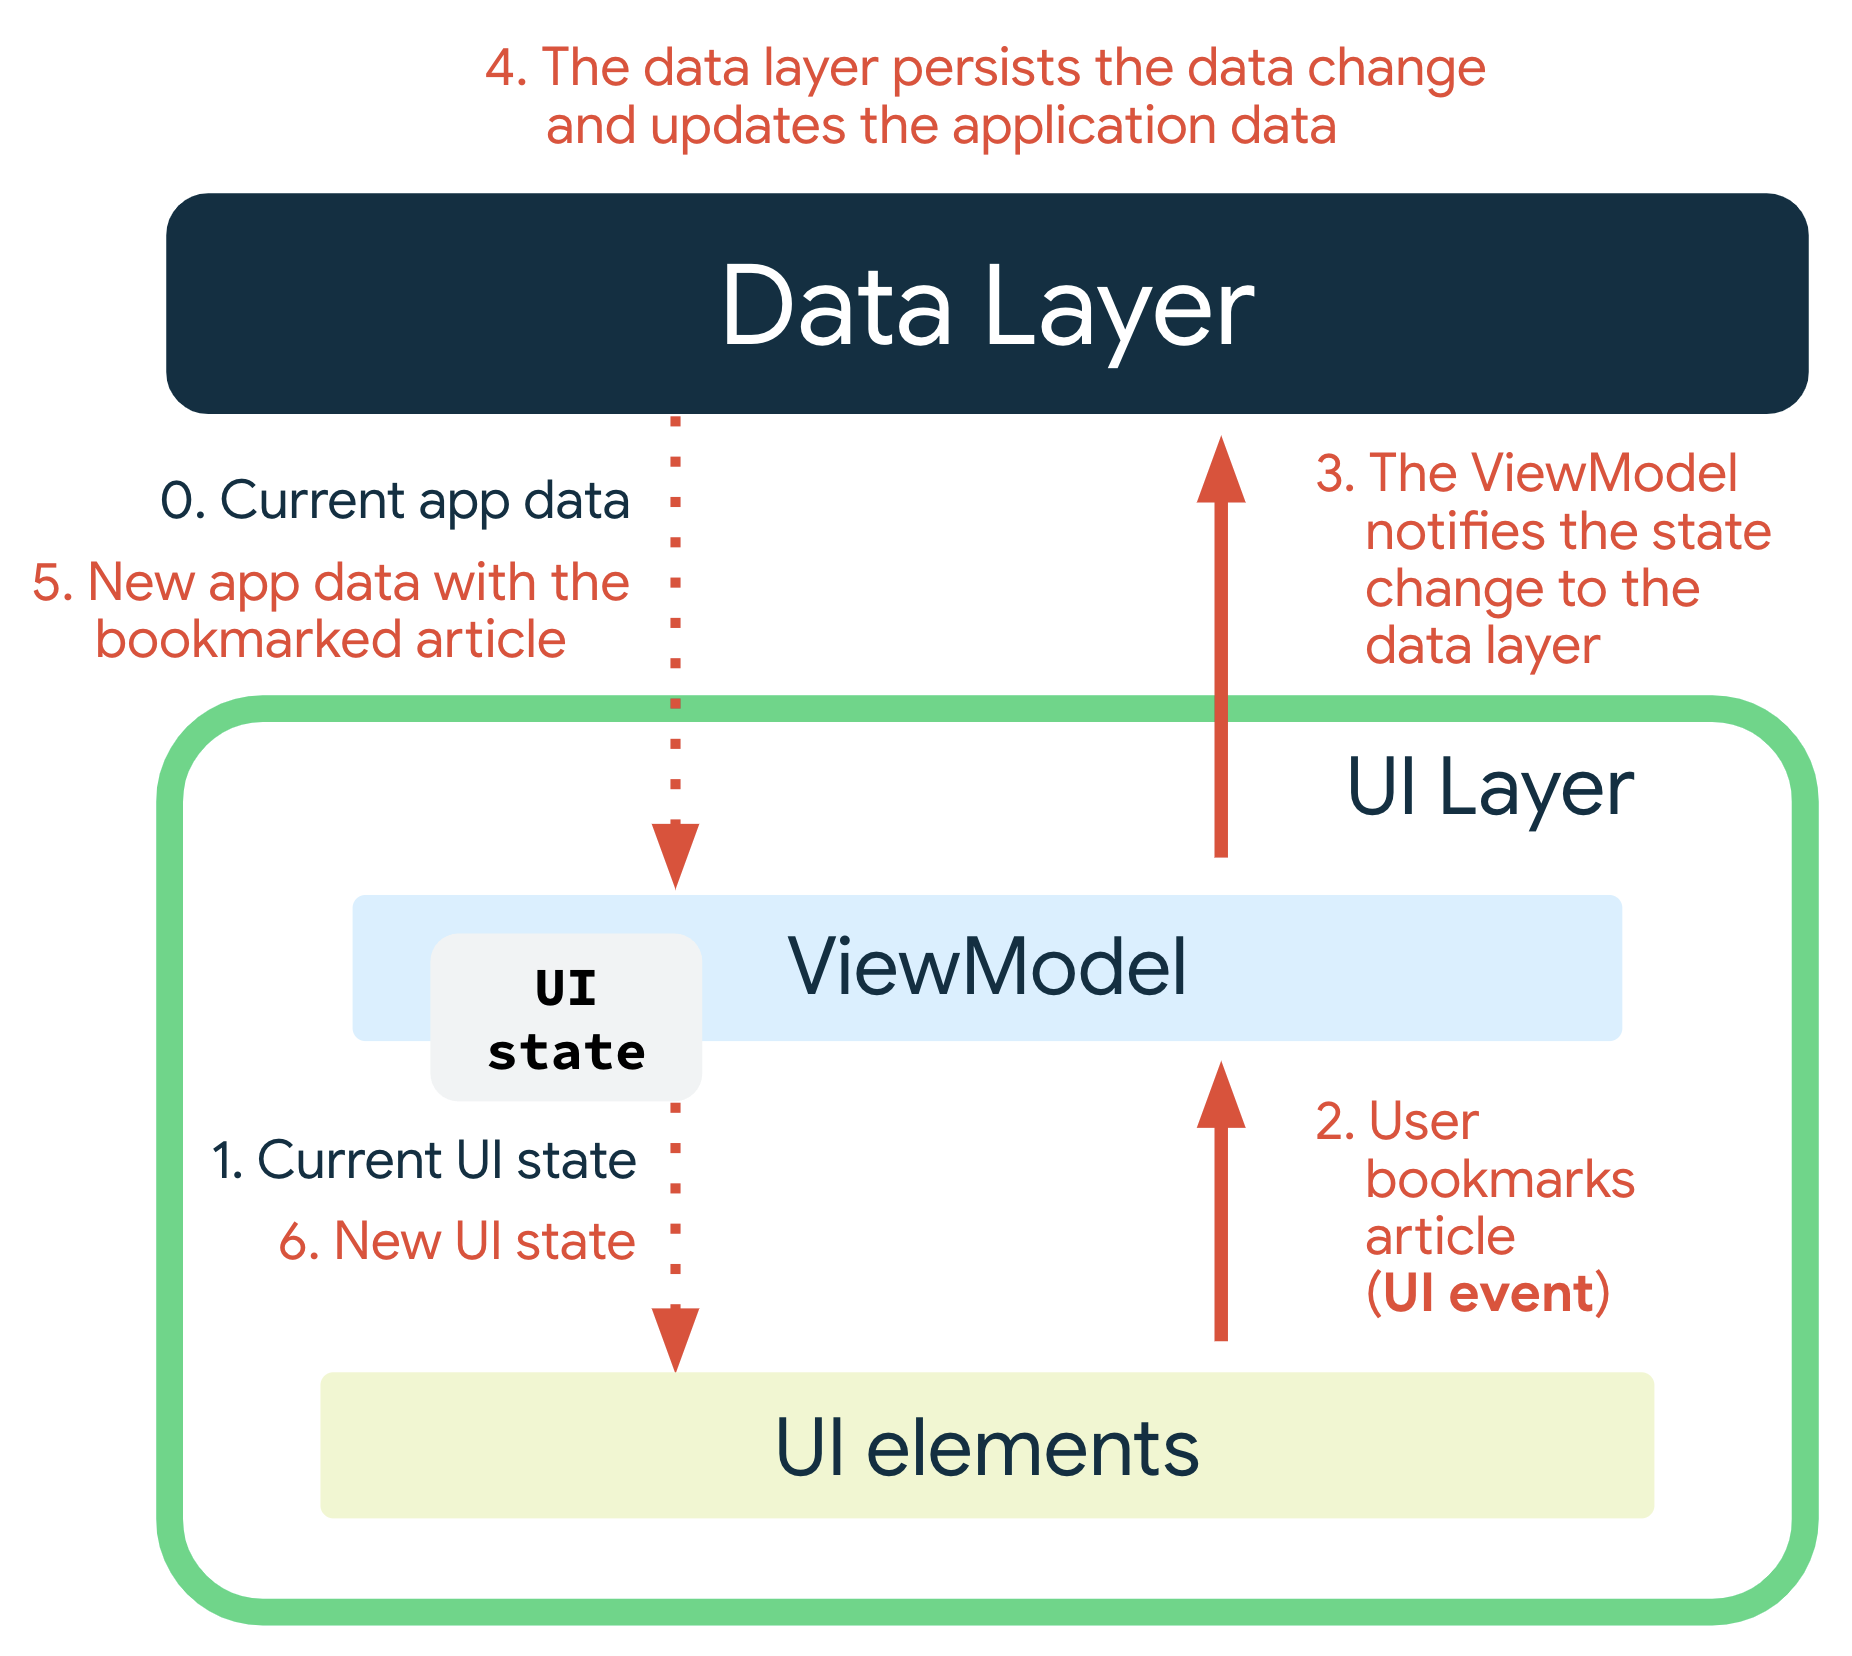
Here’s an rudimentary example of what would happen if a user were to bookmark an article in a simple news app:
Storing UI Data for our Input Service
As it turns out, we don’t actually have to use viewmodels, because InputServiceMethods don’t have to worry about configuration changes - which is the main reason to use viewmodels (other than the seperation of ui from state, of course). As is often the case when traveling a bit off the beaten path, the answers are not always totally satisfactory, though. Based on what I’ve read, it sounds like we can get away with a mere plain class for state holding. Furthermore, we’ll make our UI state a singleton by using the object keyword.
The following info is from this codelab. Even though the codelab is about viewmodels, the same principles still apply to our plain state class.
Create MorsoUiState:
Right now, the only property in our MorsoUiState is the the background text:
private var backgroundText = "Morso"
However,
Inside the ViewModel, the data should be editable, so they should be private and var. From outside the ViewModel, data should be readable, but not editable, so the data should be exposed as public and val. To achieve this behavior, Kotlin has a feature called a backing property.
object MorsoUiState {

    private var _backgroundText = "Morso"
    val backgroundText: String
        get() = _backgroundText()

    fun setBackgroundText(input: String) {
        _backgroundText = input
    }
}
Mutable data fields from state holders should never be exposed.
Updating our View with New UI Data
We can automatically update our UI using LiveData as the binding source.
First, we should update MorsoView with a function to update all of its fields(which should all be private) from the ui state and then redraw itself (using invalidate):
...

    private var backgroundText = "Morso"


    fun updateUi(morsoUiState: MorsoUiState) {
        backgroundText = morsoUiState.backgroundText.value.toString()

        invalidate()

    }
...
To work with LiveData, we must follow these steps:
- Create an instance of LiveData to hold a certain type of data. This is usually done within your ViewModel class.
but we’re not using a viewmodel hehe
object MorsoUiState {

    val backgroundText: MutableLiveData<String> by lazy {
        MutableLiveData<String>("Morso")
    }
}
- Create an Observer object that defines the onChanged() method, which controls what happens when the LiveData object’s held data changes. You usually create an Observer object in a UI controller, such as an activity or fragment.
class MorsoIME : InputMethodService() {
    private val TAG = "MorsoIME"


    override fun onCreateInputView(): View {
    val morsoLayout = layoutInflater.inflate(R.layout.input_container, null)
        morsoView = morsoLayout.findViewById<MorsoView>(R.id.morsoView)

        // Create the observer which updates the UI.
        val backgroundTextObserver = Observer<String> {

            // Update the UI
            morsoView.updateUi(morsoUiState)
        }

        return morsoLayout
    }

}
- Attach the Observer object to the LiveData object using the observe() method. The observe() method takes a LifecycleOwner object. This subscribes the Observer object to the LiveData object so that it is notified of changes. You usually attach the Observer object in a UI controller, such as an activity or fragment.
You can register an observer without an associated LifecycleOwner object using the observeForever(Observer) method. In this case, the observer is considered to be always active and is therefore always notified about modifications. You can remove these observers calling the removeObserver(Observer) method.
class MorsoIME : InputMethodService() {
    private val TAG = "MorsoIME"

    lateinit var morsoView: MorsoView
    lateinit var morsoGestureListener : MorsoGestureListener
    lateinit var morsoUiState: MorsoUiState


    override fun onCreateInputView(): View {

        val morsoLayout = layoutInflater.inflate(R.layout.input_container, null)
        morsoView = morsoLayout.findViewById<MorsoView>(R.id.morsoView)
        morsoGestureListener = morsoView.gestureListener
        morsoUiState = morsoGestureListener.morsoUiState


        // Create the observer which updates the UI.
        val backgroundTextObserver = Observer<String> {

            // Update the UI
            morsoView.updateUi(morsoUiState)
            morsoView.invalidate()
        }

        // Observe the LiveData
        morsoUiState.backgroundText.observeForever(backgroundTextObserver)

        return morsoLayout
    }

}
When we have a more complex UI state, it might be worthwhile to make the whole MorsoUiState observable.
Add to onSingleTapUp in MorsoGestureListener:
   override fun onSingleTapUp(e: MotionEvent): Boolean {
+        morsoUiState.backgroundText.value = "tapped"
        return true
    }
Our “Morso” text will change to “tapped” on a single tap.
Resetting our Background Text After a Delay
Add the following code to the backgroundTextObserver:
// Create the observer which updates the UI.
        val backgroundTextObserver = Observer<String> { newBackgroundText ->
            Log.d(TAG, "onCreateInputView: New Text!")
            // Update the UI
            morsoView.backgroundText = newBackgroundText
            morsoView.invalidate()

+            if (morsoUiState.backgroundText.value != "Morso") {
+                Handler(Looper.getMainLooper()).postDelayed({
+                    morsoUiState.backgroundText.value = "Morso"
+                }, 1000)
            }
        }
We will be able to configure the delay in settings later in the series.
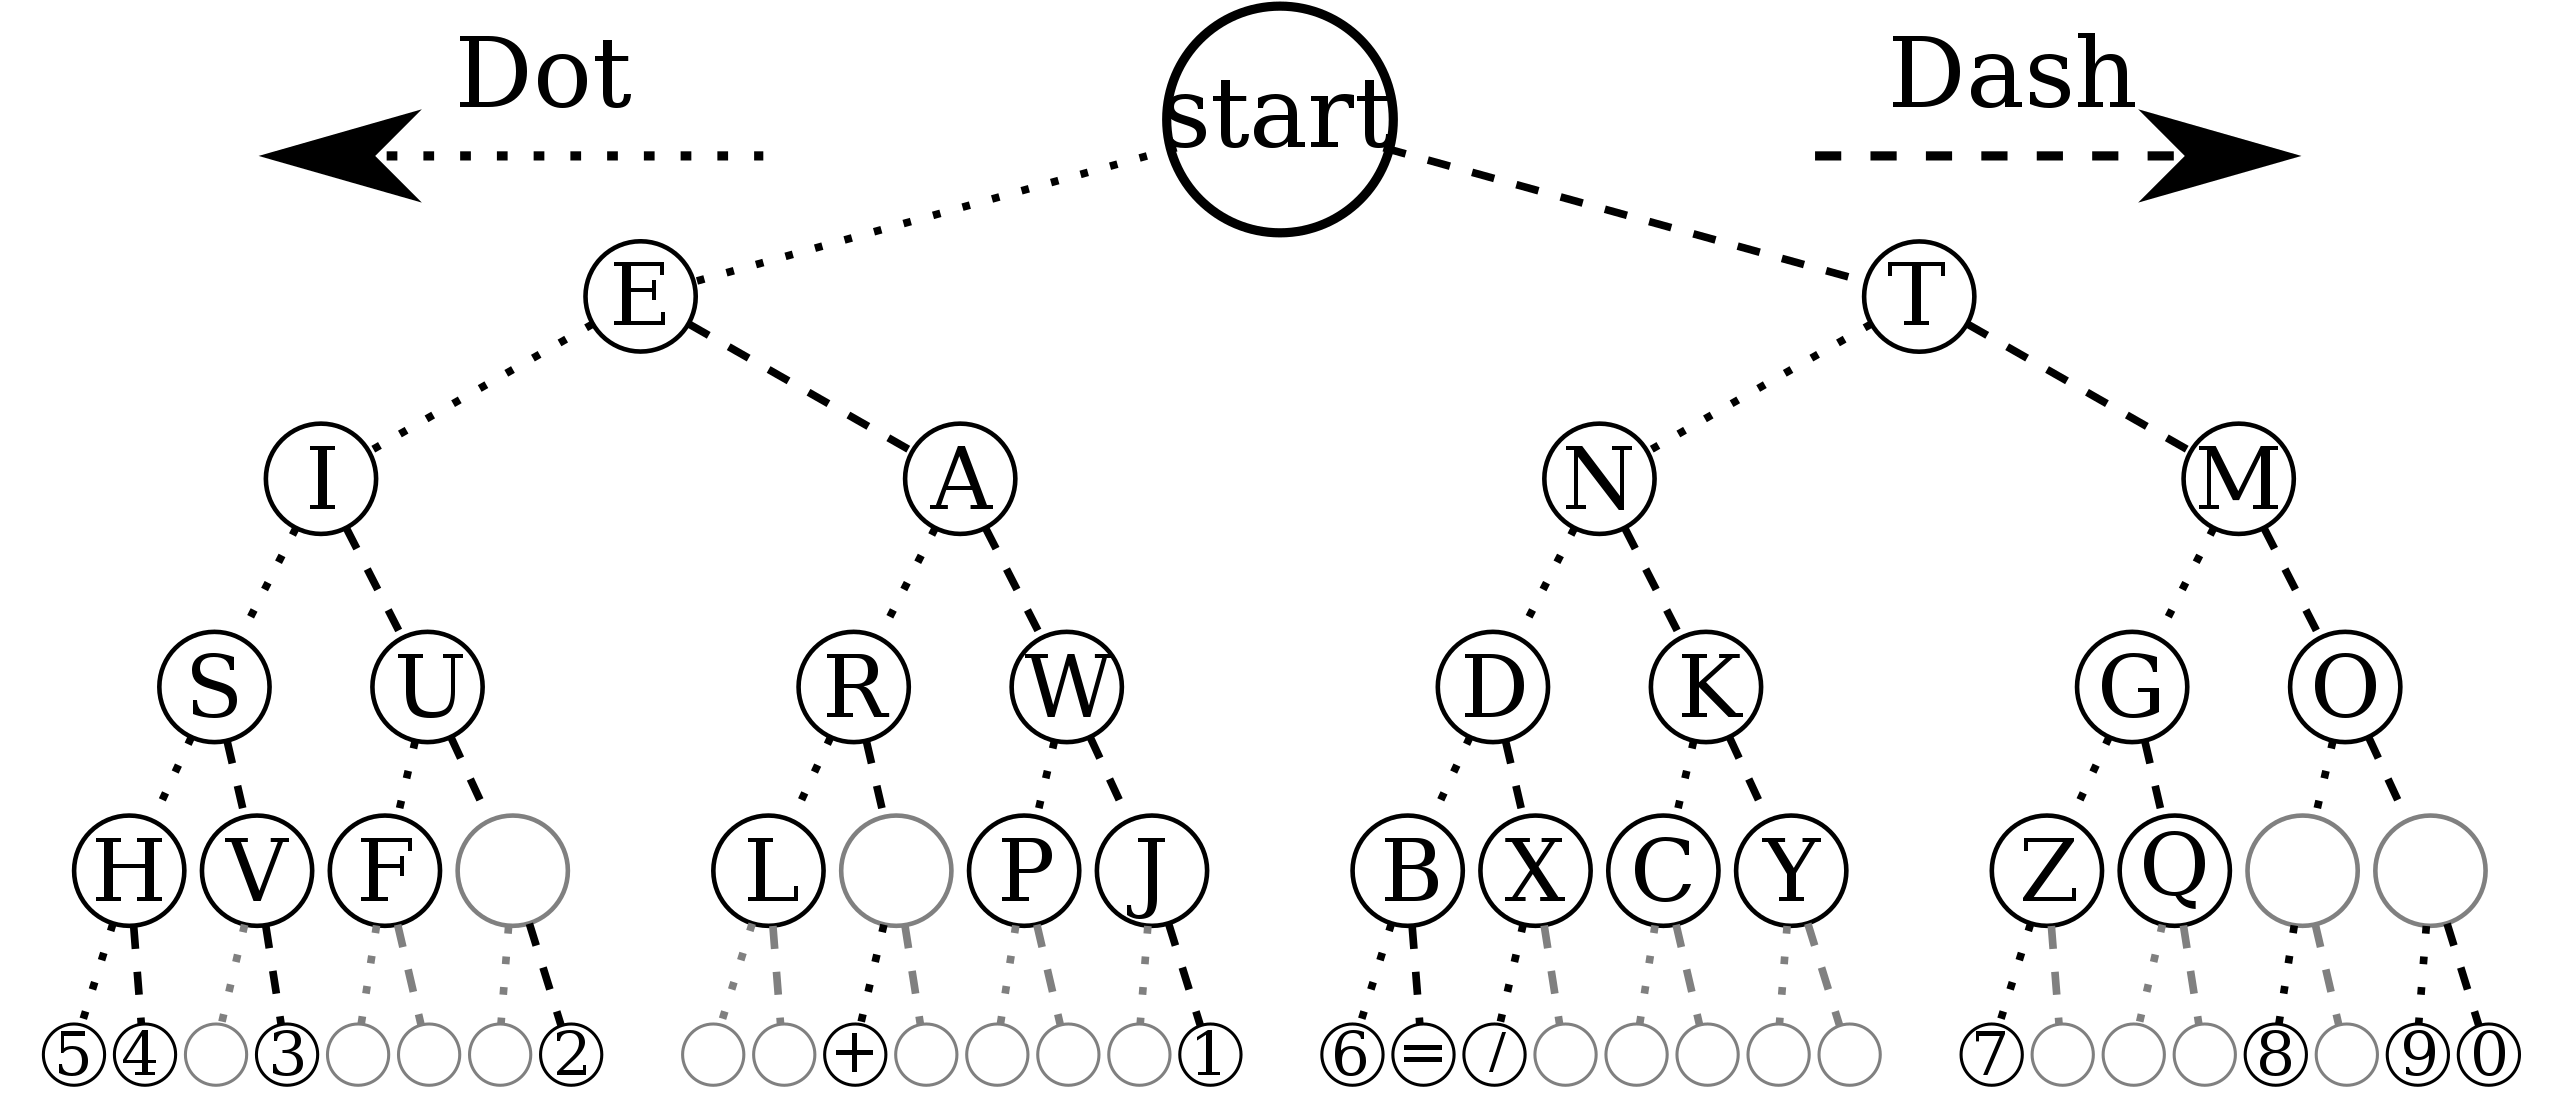
Representing Morse Code
I figure enums are a decent way to represent Morse code - we’re dealing with a few dozen values that will never change.
Another option would be to use an immutable ordered binary tree created at compile-time in a companion object. If you use a tree, be aware that Enum.compareTo() is final - the order in which the enums are declared is important for comparing/navigating the tree. Why is compareTo final?
Lets represent signals in MorseSignal:
enum class MorseSignal {
    DOT, DASH, SPACE;
}
and characters in Character:
enum class Character(vararg var sequence: MorseSignal) {

    START(),

    E(DOT),
    T(DASH),

    I(DOT, DOT),
    A(DOT, DASH),
    N(DASH, DOT),
    M(DASH, DASH),

    S(DOT, DOT, DOT),
    U(DOT, DOT, DASH),
    R(DOT, DASH, DOT),
    W(DOT, DASH, DASH),
    D(DASH, DOT, DOT),
    K(DASH, DOT, DASH),
    G(DASH, DASH, DOT),
    O(DASH, DASH, DASH),

    H(DOT, DOT, DOT, DOT),
    V(DOT, DOT, DOT, DASH),
    F(DOT, DOT, DASH, DOT),
    L(DOT, DASH, DOT, DOT),
    P(DOT, DASH, DASH, DOT),
    J(DOT, DASH, DASH, DASH),
    B(DASH, DOT, DOT, DOT),
    X(DASH, DOT, DOT, DASH),
    C(DASH, DOT, DASH, DOT),
    Y(DASH, DOT, DASH, DASH),
    Z(DASH, DASH, DOT, DOT),
    Q(DASH, DASH, DOT, DASH),

    FIVE(DOT, DOT, DOT, DOT, DOT) {
        override fun toString() = "5"
    },
    FOUR(DOT, DOT, DOT, DOT, DASH){
        override fun toString() = "4"
    },
    THREE(DOT, DOT, DOT, DASH, DASH){
        override fun toString() = "3"
    },
    TWO(DOT, DOT, DASH, DASH, DASH){
        override fun toString() = "2"
    },
    PLUS_SIGN(DOT, DASH, DOT, DASH, DOT){
        override fun toString() = "+"
    },
    ONE(DOT, DASH, DASH, DASH, DASH){
        override fun toString() = "1"
    },
    SIX(DASH, DOT, DOT, DOT, DOT){
        override fun toString() = "6"
    },
    EQUALS_SIGN(DASH, DOT, DOT, DOT, DASH){
        override fun toString() = "="
    },
    DIVIDE_SIGN(DASH, DOT, DOT, DASH, DOT){
        override fun toString() = "/"
    },
    SEVEN(DASH, DASH, DOT, DOT, DOT){
        override fun toString() = "7"
    },
    EIGHT(DASH, DASH, DASH, DOT, DOT){
        override fun toString() = "8"
    },
    NINE(DASH, DASH, DASH, DASH, DOT){
        override fun toString() = "9"
    },
    ZERO(DASH, DASH, DASH, DASH, DASH){
        override fun toString() = "0"
    },
    NULL(){
        override fun toString() = ""
    };
}
We’re going to want to be able to get the Character by its sequence once Morso detects a long enough break in input. To do so, we’ll create a map with the key being sequence and the value being the Character.
I was originally trying to use the vararg sequence(which is an array) as a key, but in order to look up the value, the array passed in had to be the exact same array as the key - not just the contents of the array. I ended up converting the sequence in Character’s construtor to a List, and using said list as a key for the dictionary:
    ...

    NINE(DASH, DASH, DASH, DASH, DOT){
        override fun toString() = "9"
    },
    ZERO(DASH, DASH, DASH, DASH, DASH){
        override fun toString() = "0"
    };

    private val sequenceList = this.sequence.asList()


    companion object {
        private val map = Character.values().associateBy(Character::sequenceList)
        fun fromSequenceList(seqList: List<MorseSignal>) = map[seqList]
    }
We can now pass in a list of signals to fromSequenceList to get the corresponding Character:
    class MorseTranslator {

        companion object {

            fun decode(vararg sequence: MorseSignal): Character? {

                return Character.fromSequenceList(sequence.asList())
            }
        }
    }
Using Morso for Input
Now we can start to create an actual input method! Again, the most helpful article for this section can be found here.
My general idea for the default behavior of Morso is as follows:
-
MorsoInputViewwill show the current input (dots and dashes) up until there’s a word-length pause - at which pointMorsoInputViewwill once again display ‘Morso’. - The current input field will reflect the input, but will only be committed upon a word-length pause.
-
MorsoInputViewwill be updated to have a cancel button for the current sequence and a backspace.
MorsoCandidatesView will come later.
Translating Gestures to Morse Code
Taps are already handled in our MorsoGestureListener. However - it’s a bit picky about what counts as a tap and doesn’t register gestures like triple-taps. Additionally, we should allow the user to customize the dot time because the dash and space duration will be defined as multiples of the base dot time.
Let’s add to MorsoGestureListener:
    fun onHold(e: MotionEvent): Boolean {

        Log.d(TAG, "onHold")
        return true

    }
    fun onShortPause(e: MotionEvent): Boolean {
        Log.d(TAG, "onShortPause")
        morsoUiState.reset()
        return true
    }

    fun onLongPause(e: MotionEvent): Boolean {
        Log.d(TAG, "onLongPause")
        inputConnection.commitText(" ", 1)

        return true
    }
In MorsoInputView, add the following members:
    class MorsoInputView @JvmOverloads constructor(
    context: Context,
    attrs: AttributeSet? = null,
    defStyleAttr: Int = 0
) : View (context, attrs, defStyleAttr) {

    private val TAG = "MorsoView"

    val gestureListener =  MorsoGestureListener()
    private val gestureDetector = GestureDetector(context, gestureListener)
+    private var downTime: Long = 0
+    private var upTime: Long = 0
+    private val dotTime: Long = 300
+    private val dashTime = 3*dotTime
+    private val signalSpaceTimeout = dotTime
+    private val letterSpaceTimeout: Long = 3*dotTime
+    private val wordSpaceTimeout: Long = 7*dotTime


    ...
and then update onTouchEvent:
        override fun onTouchEvent(event: MotionEvent): Boolean {

        val onHoldRunnable = Runnable { gestureListener.onHold(event) }
        val shortPauseRunnable = Runnable { gestureListener.onShortPause(event) }
        val longPauseRunnable = Runnable { gestureListener.onLongPause(event) }


        if (event.actionMasked == MotionEvent.ACTION_DOWN) {
            downTime = SystemClock.elapsedRealtime()

            // Cancel possible pending runnables
            handler.removeCallbacksAndMessages(null)

            // Call onHold in dashTime ms
            handler.postDelayed(onHoldRunnable,dashTime)
        }


        else if (event.actionMasked == MotionEvent.ACTION_UP) {
            // Cancel the pending hold runnable and previous pause runnables
            handler.removeCallbacksAndMessages(null)

            upTime = SystemClock.elapsedRealtime()


            // Listen for all taps with no restrictions (slop, triple-taps, etc. - unlike the default gesture detector)
            val elapsedTime = upTime - downTime
            if (elapsedTime < dotTime){
                gestureListener.onSingleTapUp(event)
            }


            // call timeouts if no input has been received
            handler.postDelayed(shortPauseRunnable, letterSpaceTimeout)
            handler.postDelayed(longPauseRunnable, wordSpaceTimeout)

            return true
        }

        // It's up to MorsoGestureListener to decide
        return gestureDetector.onTouchEvent(event)
    }
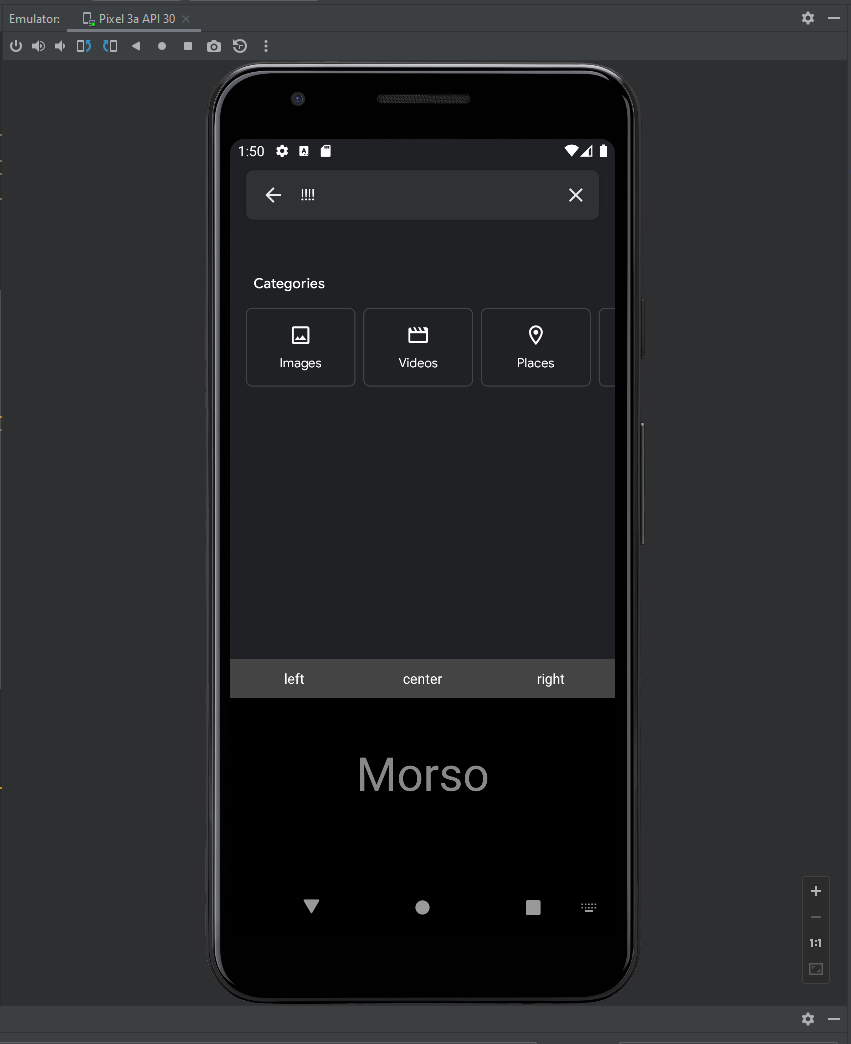
Implementing Candidates View
The candidates view is something you’re likely familiar with:
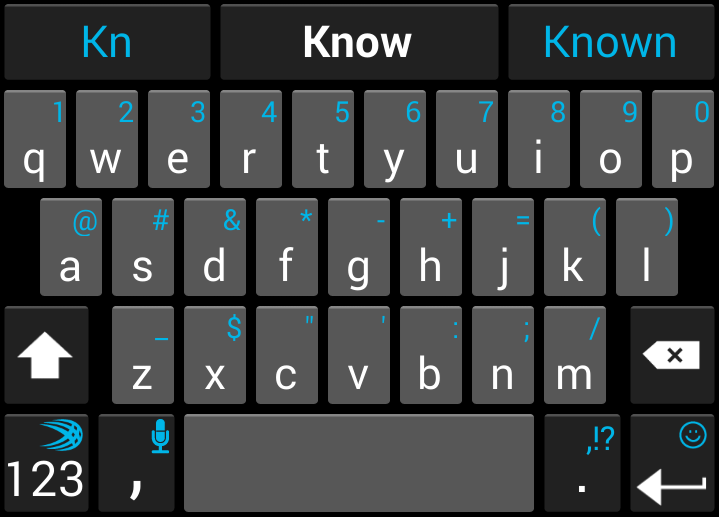
For Morso, I’d like to display the left child character, the current character (which can function as a countdown bar to the current character being committed), and the right child character in the candidates view. The rightmost suggestion can also double as a progress bar for dash inputs. One concern is that this is a practice application, so I’m not sure if I should make the suggestions clickable.
Add progress bars to appropriate candidates
First, we have to create a view MorsoCandidateView:
class MorsoCandidateView @JvmOverloads constructor(
    context: Context,
    attrs: AttributeSet? = null,
    defStyleAttr: Int = 0
) : androidx.appcompat.widget.AppCompatButton (context, attrs, defStyleAttr) {

    private val TAG = "MorsoCandidatesView"

    init {
        setBackgroundColor(Color.DKGRAY)
        setTextColor(Color.WHITE)
        gravity = Gravity.CENTER
    }


}
Next, we have to create a layout candidates.xml:
<?xml version="1.0" encoding="utf-8"?>
<androidx.constraintlayout.widget.ConstraintLayout xmlns:android="http://schemas.android.com/apk/res/android"
    xmlns:app="http://schemas.android.com/apk/res-auto"
    xmlns:tools="http://schemas.android.com/tools"
    android:layout_width="match_parent"
    android:layout_height="match_parent"
    android:background="@color/black">

    <net.eldun.morso.MorsoCandidateView
        android:id="@+id/morsoCandidateView"
        android:layout_width="0dp"
        android:layout_height="wrap_content"
        android:padding="10dp"
        android:text="left"
        app:layout_constraintBottom_toBottomOf="parent"
        app:layout_constraintEnd_toStartOf="@+id/guideline3"
        app:layout_constraintStart_toStartOf="parent"
        app:layout_constraintTop_toTopOf="parent" />

    <androidx.constraintlayout.widget.Guideline
        android:id="@+id/guideline3"
        android:layout_width="wrap_content"
        android:layout_height="wrap_content"
        android:orientation="vertical"
        app:layout_constraintGuide_percent=".3333" />

    <net.eldun.morso.MorsoCandidateView
        android:id="@+id/morsoCandidateView2"
        android:layout_width="0dp"
        android:layout_height="wrap_content"
        android:padding="10dp"
        android:text="center"
        app:layout_constraintBottom_toBottomOf="parent"
        app:layout_constraintEnd_toStartOf="@+id/guideline4"
        app:layout_constraintStart_toStartOf="@+id/guideline3"
        app:layout_constraintTop_toTopOf="parent" />

    <androidx.constraintlayout.widget.Guideline
        android:id="@+id/guideline4"
        android:layout_width="wrap_content"
        android:layout_height="wrap_content"
        android:orientation="vertical"
        app:layout_constraintGuide_percent=".6667" />

    <net.eldun.morso.MorsoCandidateView
        android:id="@+id/morsoCandidateView3"
        android:layout_width="0dp"
        android:layout_height="wrap_content"
        android:padding="10dp"
        android:text="right"
        app:layout_constraintBottom_toBottomOf="parent"
        app:layout_constraintEnd_toEndOf="parent"
        app:layout_constraintStart_toStartOf="@+id/guideline4"
        app:layout_constraintTop_toTopOf="parent" />

</androidx.constraintlayout.widget.ConstraintLayout>
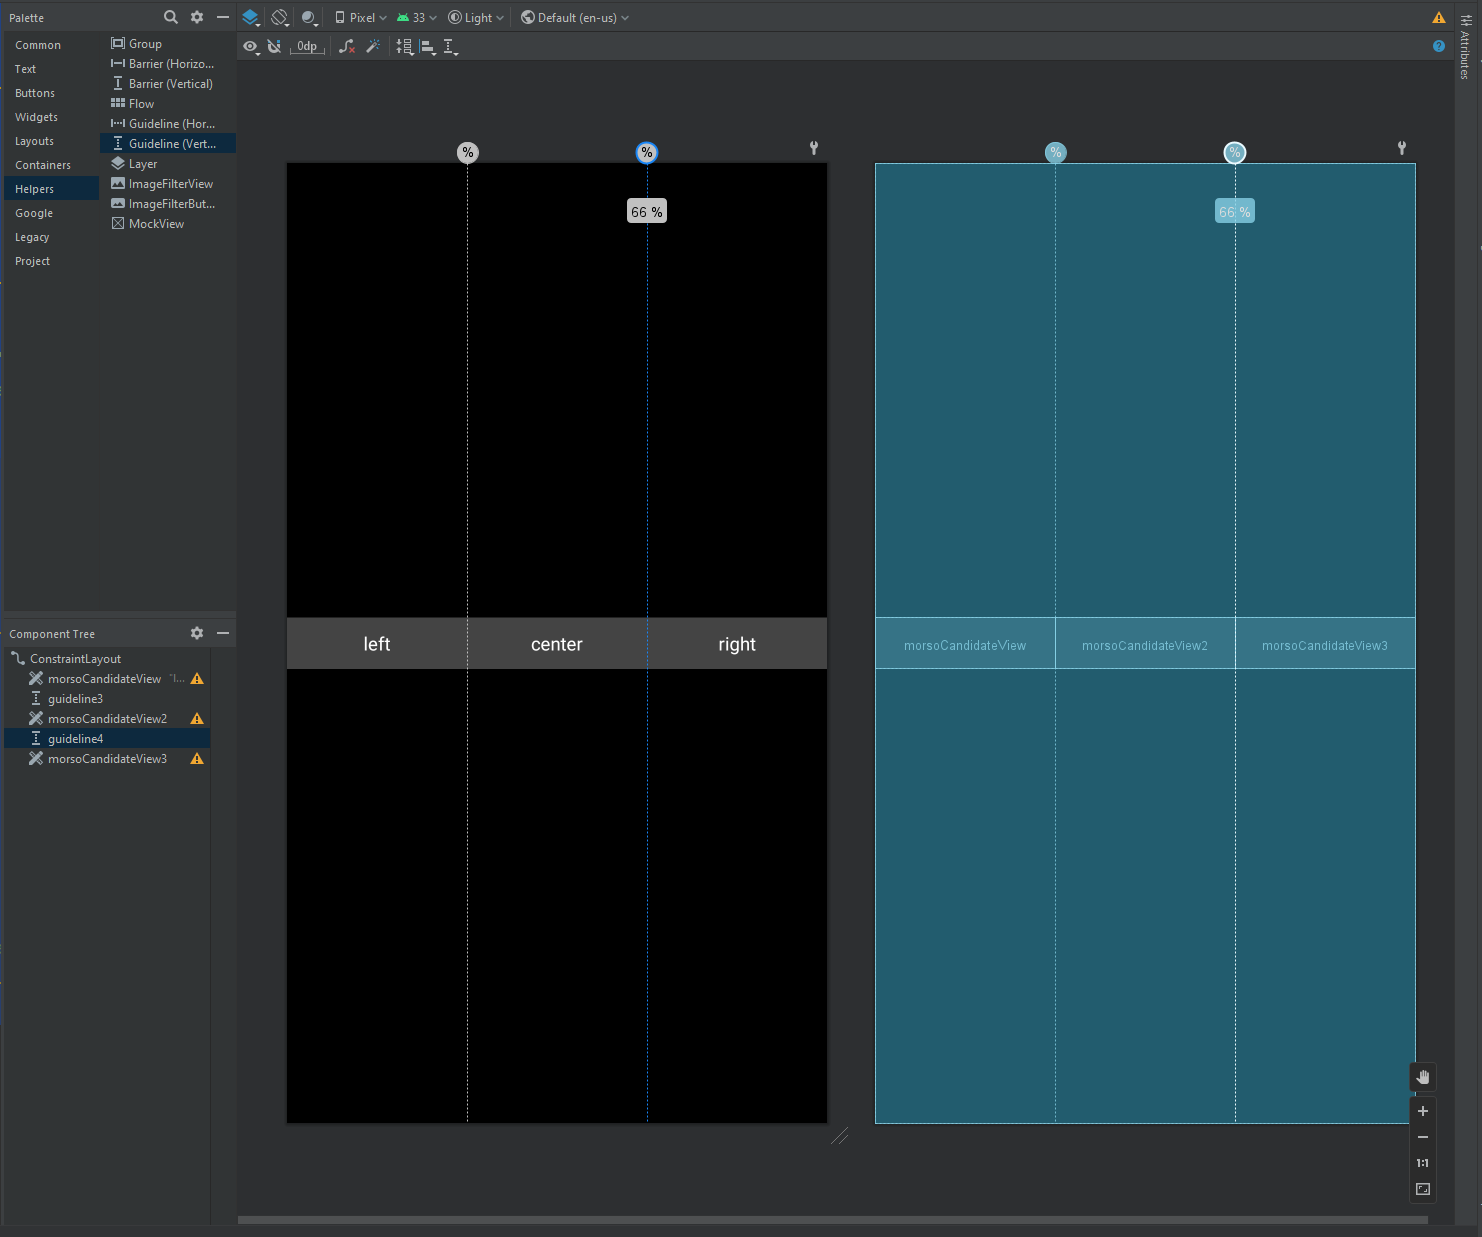
I think that since this is a practice tool, it’s alright to show the candidates view at all times. I can always add a setting to hide it later.
To display our new candidates layout, all we need to do is override MorsoIME.onCreateCandidatesView():
    override fun onCreateCandidatesView(): View {
        Log.d(TAG, "onCreateCandidatesView")
        return layoutInflater.inflate(R.layout.candidates, null)
    }
and setCandidatesViewShown(true) from MorsoIME.onCreateInputView().
Updating Candidates
The default candidates will be “E”, “”, and “T”, respectively (I overrode Character.START’s toString() to return “”). We’ll be using our Character enum class to look up candidates, similar to how we looked up values by a character’s sequence earlier on:
    companion object {
        val TAG = "Character"

        private val sequenceMap = values().associateBy(Character::sequenceList)
+        private val stringMap = values().associateBy(Character::toString)
+
        fun fromSequenceList(seqList: Listlt:MorseSignal>) = sequenceMap[seqList]
+        fun fromString(stringifiedCharacter: String) = stringMap[stringifiedCharacter]
+
Let’s also add functions to retrieve the possible options from the current sequence:
fun getDotChild(character: Character): Character {
            val result = fromSequenceList(character.sequenceList + DOT)
            if (result == null)
                return Character.NULL
            return result
        }

        fun getDotChild(characterString: String?): Character {
            val character = fromString(characterString!!)
            return getDotChild(character!!)
        }


        fun getDashChild(character: Character): Character {
            val result = fromSequenceList(character.sequenceList + DASH)
            if (result == null)
                return Character.NULL
            return result
        }

        fun getDashChild(characterString: String?): Character {
            val character = fromString(characterString!!)
            return getDashChild(character!!)
        }
We can add our candidates to MorsoUiState now.
object MorsoUiState {

    val backgroundText: MutableLiveData<String> by lazy {
        MutableLiveData<String>("Morso")
    }

    // Default characters
    val currentCandidateText: MutableLiveData<String> by lazy {
            MutableLiveData<String>(Character.START.toString())
        }
    val dotCandidateText: MutableLiveData<String> by lazy {
        MutableLiveData<String>(Character.E.toString())
    }
    val dashCandidateText: MutableLiveData<String> by lazy {
        MutableLiveData<String>(Character.T.toString())
    }

    fun reset() {
        backgroundText.value = "Morso"
        currentCandidateText.value = Character.START.toString()
        dotCandidateText.value = Character.E.toString()
        dashCandidateText.value = Character.T.toString()
    }
}
We can update our MorsoUiStateObserver like so:
class MorsoUiStateObserver(val morso: MorsoIME, val uiState: MorsoUiState) {

    init {

        observeBackgroundText()
        observeCandidates()
    }

    private fun observeBackgroundText() {
        // Create the observer which updates the UI.
        val backgroundTextObserver = Observer<String> {

            morso.updateUi()

            if (uiState.backgroundText.value != "Morso") {
                Handler(Looper.getMainLooper()).postDelayed({
                    uiState.backgroundText.value = "Morso"
                }, 1000)
            }
        }

        // Observe the LiveData
        uiState.backgroundText.observeForever(backgroundTextObserver)
    }

    private fun observeCandidates() {

        // Create the observer which updates the UI.
        val candidatesTextObserver = Observer<String> {
            morso.updateUi()
        }

        // Observe the LiveData
        uiState.currentCandidateText.observeForever(candidatesTextObserver)
        uiState.dotCandidateText.observeForever(candidatesTextObserver)
        uiState.dashCandidateText.observeForever(candidatesTextObserver)
    }


}
Now we can add logic to MorsoGestureListener, which will notify the UiStateObserver when candidate values change.
    ...
    override fun onSingleTapUp(e: MotionEvent): Boolean {
        Log.d(TAG, "onSingleTapUp")
        morsoUiState.backgroundText.value.apply { "." }

        updateCandidates(MorseSignal.DOT)

        inputConnection.commitText("!", 1)

        return true
    }


    fun onHold(e: MotionEvent): Boolean {

        updateCandidates(MorseSignal.DASH)
        Log.d(TAG, "onHold")
        return true

    }

    private fun updateCandidates(signal: MorseSignal) {

        if (signal == MorseSignal.DOT){
            morsoUiState.currentCandidateText.value = morsoUiState.dotCandidateText.value

            val newCurrent = Character.fromString(morsoUiState.currentCandidateText.value.toString())

            morsoUiState.dotCandidateText.value = Character.getDotChild(newCurrent!!).toString()
            morsoUiState.dashCandidateText.value = Character.getDashChild(newCurrent!!).toString()
        }

        else if (signal == MorseSignal.DASH){
            morsoUiState.currentCandidateText.value = morsoUiState.dashCandidateText.value

            val newCurrent = Character.fromString(morsoUiState.currentCandidateText.value.toString())

            morsoUiState.dotCandidateText.value = Character.getDotChild(newCurrent!!).toString()
            morsoUiState.dashCandidateText.value = Character.getDashChild(newCurrent!!).toString()
        }
    }
Finally, we have to update our IME class:
class MorsoIME : InputMethodService() {
    private val TAG = "MorsoIME"
    lateinit var morsoInputView: MorsoInputView

+    lateinit var candidatesLayout: View
+    private var candidatesVisible = false

    lateinit var morsoGestureListener : MorsoGestureListener
    private val morsoUiState = MorsoUiState
    lateinit var morsoUiStateObserver: MorsoUiStateObserver


    /**
     * Create and return the view hierarchy used for the input area (such as
     * a soft keyboard).  This will be called once, when the input area is
     * first displayed.  You can return null to have no input area; the default
     * implementation returns null.
     *
     * <p>To control when the input view is displayed, implement
     * {@link #onEvaluateInputViewShown()}.
     * To change the input view after the first one is created by this
     * function, use {@link #setInputView(View)}.
     */
    override fun onCreateInputView(): View {
//        android.os.Debug.waitForDebugger()

        val morsoLayout = layoutInflater.inflate(R.layout.morso, null)
        morsoInputView = morsoLayout.findViewById<MorsoInputView>(R.id.morsoInputView)
        morsoGestureListener = morsoInputView.gestureListener
+       morsoGestureListener.inputConnection = currentInputConnection
        morsoUiStateObserver = MorsoUiStateObserver(this, morsoUiState)

        setCandidatesViewShown(true)

        return morsoLayout
    }


+    /**
+     * Set Morso's GestureListener to the updated selection
+     */
+    override fun onUpdateSelection(
+        oldSelStart: Int,
+        oldSelEnd: Int,
+        newSelStart: Int,
+        newSelEnd: Int,
+        candidatesStart: Int,
+        candidatesEnd: Int
+    ) {
+        super.onUpdateSelection(
+            oldSelStart,
+            oldSelEnd,
+            newSelStart,
+            newSelEnd,
+            candidatesStart,
+            candidatesEnd
+        )
+
+        morsoGestureListener.inputConnection = currentInputConnection
+    }

+    override fun onCreateCandidatesView(): View {
+
+        candidatesVisible = true
+
+        candidatesLayout = layoutInflater.inflate(R.layout.candidates, null)
+
+        return candidatesLayout
+    }
+
+    override fun onFinishCandidatesView(finishingInput: Boolean) {
+        candidatesVisible = false
+        super.onFinishCandidatesView(finishingInput)
+    }

    /**
     * Called automatically from MorsoUiStateObserver whenever the state changes.
     */
+    fun updateUi() {
+        morsoInputView.updateUi(morsoUiState)
+
+        if (candidatesVisible) {
+            var current = candidatesLayout.findViewById<MorsoCandidateView>(R.id.morsoCurrentCandidate)
+            var dot = candidatesLayout.findViewById<MorsoCandidateView>(R.id.morsoDotCandidate)
+            var dash = candidatesLayout.findViewById<MorsoCandidateView>(R.id.morsoDashCandidate)
+
+            Log.d(TAG, "updateUi pre: ${current.text} ${dot.text} ${dash.text}")
+            current.text = morsoUiState.currentCandidateText.value
+            dot.text = morsoUiState.dotCandidateText.value
+            dash.text = morsoUiState.dashCandidateText.value
+            Log.d(TAG, "updateUi post: ${current.text} ${dot.text} ${dash.text}")
+
+
+            candidatesLayout.invalidate()
+        }
+
+    }

}
The result:
I just found out that there’s a widget called TextSwitcher which is useful for animating text labels. We can implement them later in the series.
Sending Input
Now that we register all the correct gestures and update the UI appropriately (minimally, at this point), we can use Morso to send info to text fields.
First, we need to remove the background text reset logic from MorsoUiStateObserver:
 private fun observeBackgroundText() {
        // Create the observer which updates the UI.
        val backgroundTextObserver = Observer<String> {

            morso.updateUi()

-            if (uiState.backgroundText.value != "Morso") {
-                Handler(Looper.getMainLooper()).postDelayed({
-                    uiState.backgroundText.value = "Morso"
-                }, 1000)
-            }
        }

        // Observe the LiveData
        uiState.backgroundText.observeForever(backgroundTextObserver)
    }
Add a member DEFAULT_BACKGROUND_TEXT to MorsoUiState:
object MorsoUiState {

+    val DEFAULT_BACKGROUND_TEXT = "Morso"

    val backgroundText: MutableLiveData<String> by lazy {
!        MutableLiveData<String>(DEFAULT_BACKGROUND_TEXT)
    }

    // Default characters
    val currentCandidateText: MutableLiveData<String> by lazy {
            MutableLiveData<String>(Character.START.toString())
        }
    val dotCandidateText: MutableLiveData<String> by lazy {
        MutableLiveData<String>(Character.E.toString())
    }
    val dashCandidateText: MutableLiveData<String> by lazy {
        MutableLiveData<String>(Character.T.toString())
    }

    fun reset() {
!        backgroundText.value = DEFAULT_BACKGROUND_TEXT
        currentCandidateText.value = Character.START.toString()
        dotCandidateText.value = Character.E.toString()
        dashCandidateText.value = Character.T.toString()
    }
}
Now all we have to do is update our gesture listener actions:
class MorsoGestureListener : GestureDetector.SimpleOnGestureListener() {

    val TAG = "MorsoGestureListener"

    private var morsoUiState = MorsoUiState
    lateinit var inputConnection: InputConnection

    /**
     * Notified when a tap occurs with the down [MotionEvent]
     * that triggered it. This will be triggered immediately for
     * every down event. All other events should be preceded by this.
     *
     * @param e The down motion event.
     */
    override fun onDown(e: MotionEvent): Boolean {
        return true
    }

    /**
     * Notified when a tap occurs with the up [MotionEvent]
     * that triggered it.
     *
     * @param e The up motion event that completed the first tap
     * @return true if the event is consumed, else false
     */
    override fun onSingleTapUp(e: MotionEvent): Boolean {
        Log.d(TAG, "onSingleTapUp")

+        if (updateCandidates(MorseSignal.DOT))
+            showUserInput(".")

        return true
    }


    fun onHold(e: MotionEvent): Boolean {
        Log.d(TAG, "onHold")


+        if (updateCandidates(MorseSignal.DASH))
+            showUserInput("-")

        return true

    }

    fun onShortPause(e: MotionEvent): Boolean {
        Log.d(TAG, "onShortPause")
        inputConnection.commitText(morsoUiState.currentCandidateText.value, 1)

        morsoUiState.reset()
        return true
    }

    fun onLongPause(e: MotionEvent): Boolean {
        Log.d(TAG, "onLongPause")
+        inputConnection.commitText(" ", 1)

        return true
    }

+    private fun showUserInput(input: String) {
+
+        if (morsoUiState.backgroundText.value.equals(morsoUiState.DEFAULT_BACKGROUND_TEXT))
+            morsoUiState.backgroundText.value = input
+        else
+            morsoUiState.backgroundText.value += input
+
+    }

+    /**
+     * Update current candidate, dot candidate, and dash candidate IF the character at @param signal
+     * from the current sequence is not null.
+     *
+     * @param signal the newest signal added to the sequence
+     *
+     * @return true if the candidates were updated, otherwise false
+     */
+    private fun updateCandidates(signal: MorseSignal): Boolean {
+
+        if (signal == MorseSignal.DOT) {
+            val dotChild = Character.getDotChild(morsoUiState.currentCandidateText.value)
+
+            if (dotChild == Character.NULL) {
+                return false
+            }
+
+            else {
+                val newCurrent = dotChild.toString()
+
+                morsoUiState.currentCandidateText.value = newCurrent
+
+                morsoUiState.dotCandidateText.value = Character.getDotChild(newCurrent).toString()
+                morsoUiState.dashCandidateText.value = Character.getDashChild(newCurrent).toString()
+
+                return true
+            }
+        }
+
+        else if (signal == MorseSignal.DASH) {
+            val dashChild = Character.getDashChild(morsoUiState.currentCandidateText.value)
+
+            if (dashChild == Character.NULL) {
+                return false
+            }
+
+            else {
+                val newCurrent = dashChild.toString()
+
+                morsoUiState.currentCandidateText.value = newCurrent
+
+                morsoUiState.dotCandidateText.value = Character.getDotChild(newCurrent).toString()
+                morsoUiState.dashCandidateText.value = Character.getDashChild(newCurrent).toString()
+
+                return true
+            }
+        }
To be continued
In the next part of this series, we can focus on making the user experience more polished by adding more visual & haptic feedback, creating a settings screen, and addressing more general IME considerations.