
Getting Familiar with Java Spring Boot
In a recent interview, I was informed that it might be beneficial for me to learn a smidge about Spring Boot before the second interview. This is me, familiarizing.
Contents
- What is Spring?
- Why use Spring?
- What is Spring Boot?
- Getting Started with Spring’s Guides
- Diving Deeper
- Closing Thoughts
What is Spring?
Spring is a Java framework - the world’s most popular.
Why use Spring?
What is Spring Boot?
From Spring’s documentation:
Spring Boot makes it easy to create stand-alone, production-grade Spring based Applications that you can “just run”.
We take an opinionated view of the Spring platform and third-party libraries so you can get started with minimum fuss. Most Spring Boot applications need minimal Spring configuration.
With the ability to:
- Create stand-alone Spring applications
- Embed Tomcat, Jetty or Undertow directly (no need to deploy WAR files)
- Provide opinionated ‘starter’ dependencies to simplify your build configuration
- Automatically configure Spring and 3rd party libraries whenever possible
- Provide production-ready features such as metrics, health checks, and externalized configuration
- Absolutely no code generation and no requirement for XML configuration
If you want to read more about the differences between Spring and Spring Boot, you can check out this article.
Getting Started with Spring’s Guides
Spring has a few suggested guides on their Spring Boot page. Let’s start from the start with the Quickstart guide.
The Quickstart Guide
The goal here, of course, is to build a classic “Hello, World” endpoint.
Project configuration
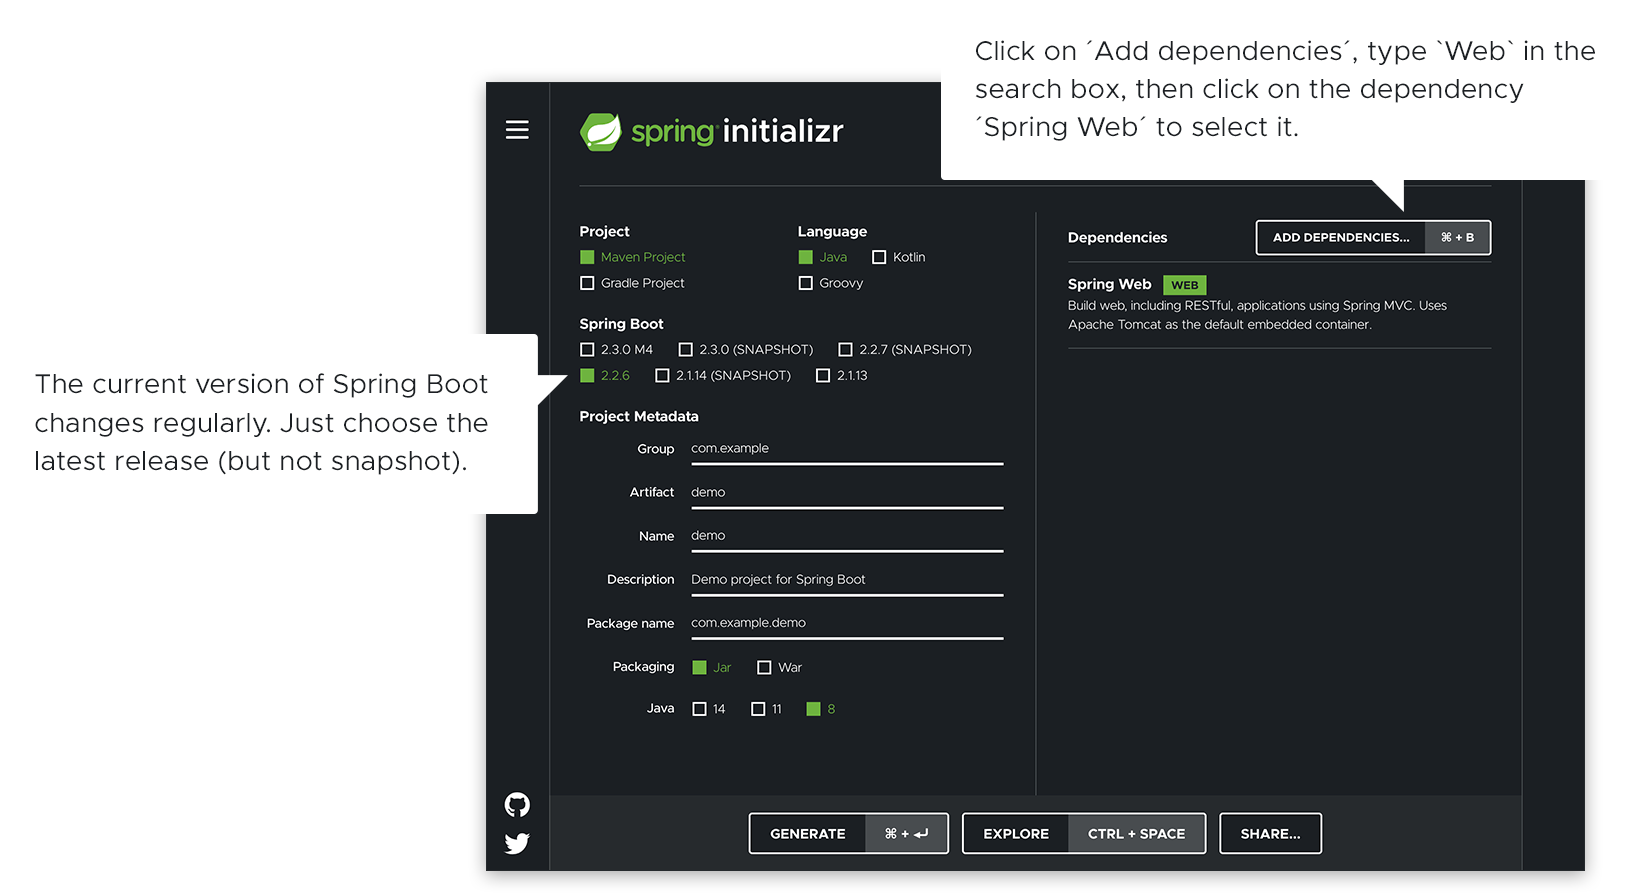
We’ll start by creating a new Spring Boot “web” project using a .zip generated from start.spring.io.
Adding our Code
Here’s the diff between the generated code and what we’re adding:
package com.example.Demo;

import org.springframework.boot.SpringApplication;
import org.springframework.boot.autoconfigure.SpringBootApplication;
+ import org.springframework.web.bind.annotation.GetMapping;
+ import org.springframework.web.bind.annotation.RequestParam;
+ import org.springframework.web.bind.annotation.RestController;

@SpringBootApplication
+ @RestController
public class DemoApplication {

    public static void main(String[] args) {
      SpringApplication.run(DemoApplication.class, args);
    }

+   @GetMapping("/hello")
+   public String hello(@RequestParam(value = "name", defaultValue = "World") String name) {
+     return String.format("Hello %s!", name);
+   }
}
That’s it! Obviously, hello() can accept a name. The @RestController annotation lets Spring know that this code describes an endpoint. @GetMapping("/hello") tells spring to use hello() to answer requests sent to localhost:8080/hello. @RequestParam tells Spring to expect a name value, defaulting to "World".
Running Hello World
To run our application (with Maven):
evan@pop-os:~/Projects/eldun/SpringBoot/demo$ ./mvnw spring-boot:run
The guide doesn’t go into detail about what’s happening here - you can read a little more about it here or check out Maven’s website.
If you’re using WSL, you might get the following error.
Error: JAVA_HOME is not defined correctly.
  We cannot execute
You can either set your JAVA_HOME, install Java in WSL, or just run the command in powershell/cmd. </span>
Visit http://localhost:8080/hello and you’ll see something like this:
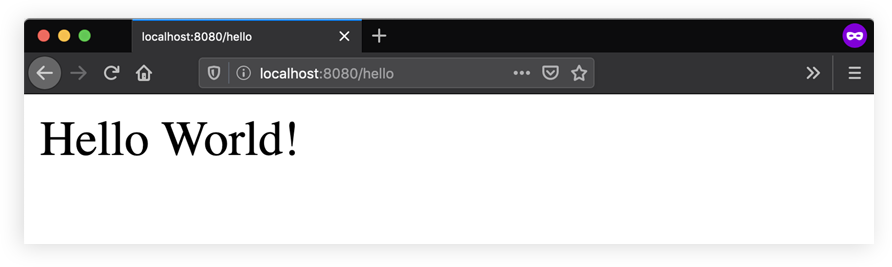
Add ?name=YourName to the end of the URL to pass a parameter.
Building a Simple Web App with Spring Boot
Based on the guide found here.
Getting Started
We can download or clone the initial code for this guide from github.
Another Reason to use Spring Boot
Spring Boot offers a fast way to build applications. It looks at your classpath and at the beans you have configured, makes reasonable assumptions about what you are missing, and adds those items. With Spring Boot, you can focus more on business features and less on infrastructure.
Understanding our Web Controller
We can take a look at the initial code (under initial/src/.../HelloController.java).
package com.example.springboot;

import org.springframework.web.bind.annotation.GetMapping;
import org.springframework.web.bind.annotation.RestController;

@RestController
public class HelloController {

	@GetMapping("/")
	public String index() {
		return "Greetings from Spring Boot!";
	}

}
The class is flagged as a @RestController, meaning it is ready for use by Spring MVC to handle web requests. @GetMapping maps
/to theindex()method. When invoked from a browser or by using curl on the command line, the method returns pure text. That is because @RestController combines @Controller and @ResponseBody, two annotations that results in web requests returning data rather than a view.
Understanding our Application Class
Let’s take a look at our initial Application class(initial/src/.../Application.java):
package com.example.springboot;

import java.util.Arrays;

import org.springframework.boot.SpringApplication;
import org.springframework.boot.autoconfigure.SpringBootApplication;
import org.springframework.context.ApplicationContext;

@SpringBootApplication
public class Application {

	public static void main(String[] args) {
		ApplicationContext ctx = SpringApplication.run(Application.class, args);

		System.out.println("Let's inspect the beans provided by Spring Boot:");

		String[] beanNames = ctx.getBeanDefinitionNames();
		Arrays.sort(beanNames);
		for (String beanName : beanNames) {
			System.out.println(beanName);
		}
	}

}
@SpringBootApplication is a convenience annotation that adds all of the following:
@Configuration: Tags the class as a source of bean definitions for the application context.
@EnableAutoConfiguration: Tells Spring Boot to start adding beans based on classpath settings, other beans, and various property settings. For example, if spring-webmvc is on the classpath, this annotation flags the application as a web application and activates key behaviors, such as setting up a DispatcherServlet.
@ComponentScan: Tells Spring to look for other components, configurations, and services in the com/example package, letting it find the controllers.
The main() method uses Spring Boot’s SpringApplication.run() method to launch an application. Did you notice that there was not a single line of XML? There is no web.xml file, either. This web application is 100% pure Java and you did not have to deal with configuring any plumbing or infrastructure.
There is also a CommandLineRunner method marked as a @Bean, and this runs on start up. It retrieves all the beans that were created by your application or that were automatically added by Spring Boot. It sorts them and prints them out.
This is the first time I’ve run into “beans.” What are they? Here’s Spring’s chapter on the IoC principle, and here’s Baeldung’s explanation.
Running the app
Executing the following command will output our beans:
./mvnw spring-boot:run
Let's inspect the beans provided by Spring Boot:
application
beanNameHandlerMapping
defaultServletHandlerMapping
dispatcherServlet
embeddedServletContainerCustomizerBeanPostProcessor
handlerExceptionResolver
helloController
httpRequestHandlerAdapter
messageSource
mvcContentNegotiationManager
mvcConversionService
mvcValidator
org.springframework.boot.autoconfigure.MessageSourceAutoConfiguration
org.springframework.boot.autoconfigure.PropertyPlaceholderAutoConfiguration
org.springframework.boot.autoconfigure.web.EmbeddedServletContainerAutoConfiguration
org.springframework.boot.autoconfigure.web.EmbeddedServletContainerAutoConfiguration$DispatcherServletConfiguration
org.springframework.boot.autoconfigure.web.EmbeddedServletContainerAutoConfiguration$EmbeddedTomcat
org.springframework.boot.autoconfigure.web.ServerPropertiesAutoConfiguration
org.springframework.boot.context.embedded.properties.ServerProperties
org.springframework.context.annotation.ConfigurationClassPostProcessor.enhancedConfigurationProcessor
org.springframework.context.annotation.ConfigurationClassPostProcessor.importAwareProcessor
org.springframework.context.annotation.internalAutowiredAnnotationProcessor
org.springframework.context.annotation.internalCommonAnnotationProcessor
org.springframework.context.annotation.internalConfigurationAnnotationProcessor
org.springframework.context.annotation.internalRequiredAnnotationProcessor
org.springframework.web.servlet.config.annotation.DelegatingWebMvcConfiguration
propertySourcesBinder
propertySourcesPlaceholderConfigurer
requestMappingHandlerAdapter
requestMappingHandlerMapping
resourceHandlerMapping
simpleControllerHandlerAdapter
tomcatEmbeddedServletContainerFactory
viewControllerHandlerMapping
We’ve got the autoconfigure beans. Great.
Run the service with curl and you should get the following output:
$ curl http://localhost:8080
Greetings from Spring Boot!
Unit Testing our Endpoint
Spring facilitates quick and easy unit testing. Since we’re using Maven, we have to add to our pom.xml:
<dependency>
	<groupId>org.springframework.boot</groupId>
	<artifactId>spring-boot-starter-test</artifactId>
	<scope>test</scope>
</dependency>
Now we create a simple test at src/test/java/com/example/springboot/HelloControllerTest.java:
package com.example.springboot;

import static org.hamcrest.Matchers.equalTo;
import static org.springframework.test.web.servlet.result.MockMvcResultMatchers.content;
import static org.springframework.test.web.servlet.result.MockMvcResultMatchers.status;

import org.junit.jupiter.api.Test;

import org.springframework.beans.factory.annotation.Autowired;
import org.springframework.boot.test.autoconfigure.web.servlet.AutoConfigureMockMvc;
import org.springframework.boot.test.context.SpringBootTest;
import org.springframework.http.MediaType;
import org.springframework.test.web.servlet.MockMvc;
import org.springframework.test.web.servlet.request.MockMvcRequestBuilders;

@SpringBootTest
@AutoConfigureMockMvc
public class HelloControllerTest {

	@Autowired
	private MockMvc mvc;

	@Test
	public void getHello() throws Exception {
		mvc.perform(MockMvcRequestBuilders.get("/").accept(MediaType.APPLICATION_JSON))
				.andExpect(status().isOk())
				.andExpect(content().string(equalTo("Greetings from Spring Boot!")));
	}
}
MockMvc comes from Spring Test and lets you, through a set of convenient builder classes, send HTTP requests into the DispatcherServlet and make assertions about the result. Note the use of @AutoConfigureMockMvc and @SpringBootTest to inject a MockMvc instance. Having used @SpringBootTest, we are asking for the whole application context to be created. An alternative would be to ask Spring Boot to create only the web layers of the context by using @WebMvcTest. In either case, Spring Boot automatically tries to locate the main application class of your application, but you can override it or narrow it down if you want to build something different.
In addition to mocking objects, we can test the whole stack (Integrated test) (src/test/java/com/example/springboot/HelloControllerIT.java):
package com.example.springboot;

import org.junit.jupiter.api.Test;

import org.springframework.beans.factory.annotation.Autowired;
import org.springframework.boot.test.context.SpringBootTest;
import org.springframework.boot.test.web.client.TestRestTemplate;
import org.springframework.http.ResponseEntity;

import static org.assertj.core.api.Assertions.assertThat;

@SpringBootTest(webEnvironment = SpringBootTest.WebEnvironment.RANDOM_PORT)
public class HelloControllerIT {

	@Autowired
	private TestRestTemplate template;

    @Test
    public void getHello() throws Exception {
        ResponseEntity<String> response = template.getForEntity("/", String.class);
        assertThat(response.getBody()).isEqualTo("Greetings from Spring Boot!");
    }
}
The embedded server starts on a random port because of webEnvironment = SpringBootTest.WebEnvironment.RANDOM_PORT, and the actual port is configured automatically in the base URL for the TestRestTemplate.
Adding Production-grade Services
Spring Boot provides several management services (health, audits, beans, and more) with its actuator module. We’ll add a dependency to our pom.xml:
<dependency>
	<groupId>org.springframework.boot</groupId>
	<artifactId>spring-boot-starter-actuator</artifactId>
</dependency>
Upon restarting the service, we’ll see a bunch of new endpoints - management services provided by Spring Boot.
management.endpoint.configprops-org.springframework.boot.actuate.autoconfigure.context.properties.ConfigurationPropertiesReportEndpointProperties
management.endpoint.env-org.springframework.boot.actuate.autoconfigure.env.EnvironmentEndpointProperties
management.endpoint.health-org.springframework.boot.actuate.autoconfigure.health.HealthEndpointProperties
management.endpoint.logfile-org.springframework.boot.actuate.autoconfigure.logging.LogFileWebEndpointProperties
management.endpoints.jmx-org.springframework.boot.actuate.autoconfigure.endpoint.jmx.JmxEndpointProperties
management.endpoints.web-org.springframework.boot.actuate.autoconfigure.endpoint.web.WebEndpointProperties
management.endpoints.web.cors-org.springframework.boot.actuate.autoconfigure.endpoint.web.CorsEndpointProperties
management.health.diskspace-org.springframework.boot.actuate.autoconfigure.system.DiskSpaceHealthIndicatorProperties
management.info-org.springframework.boot.actuate.autoconfigure.info.InfoContributorProperties
management.metrics-org.springframework.boot.actuate.autoconfigure.metrics.MetricsProperties
management.metrics.export.simple-org.springframework.boot.actuate.autoconfigure.metrics.export.simple.SimpleProperties
management.server-org.springframework.boot.actuate.autoconfigure.web.server.ManagementServerProperties
We can visit these new endpoints with a browser or curl while the app is running:
For more details about each of these REST endpoints and how you can tune their settings with an application.properties file (in src/main/resources), see the the documentation about the endpoints.
Spring Boot Starters
We’ve used a few starters, but there are many more.
Building a RESTful Service
This is the last “Getting Started” tutorial on the Spring Boot Overview page. It seems to be extremely similar to our “Hello, World” example, so I’m not going to do it :).
Diving Deeper
Spring has curated a surprisingly large collection of guides that are much more involved than those above. I actually wish I had started here! Let’s build a more complete RESTful service using this guide.
Building a More Complete RESTful Service
What’s important to realize is that REST, however ubiquitous, is not a standard, per se, but an approach, a style, a set of constraints on your architecture that can help you build web-scale systems. In this tutorial we will use the Spring portfolio to build a RESTful service while leveraging the stackless features of REST.
The guide I’ll be following is comprehensive - I don’t see any value in essentially re-writing it here. I’d highly recommend checking it out!
Uh-oh. Attempting to run the app will introduce us to some compilation errors about javax packages. javax.* import statements got renamed to jakarta.* and nobody updated the tutorial.
When creating a RESTful service, the tutorial skips over the imports needed for HATEOAS (and VS Code didn’t make any suggestions). Refer to the Github repo for future compilation errors regarding missing symbols.
Closing Thoughts
Nice tutorial! Working with Spring was fast and fun. I am still a bit unclear on how everything is working behind the scenes, but familiarity will come with time. Here’s hoping I get the job!